Using Agent Skills
The Skills page is your hub for managing Agent Skills — structured workflows that give the SRI Agent domain expertise. Enable pre-built system skills, create custom skills tailored to your team’s runbooks, and manage everything from one place.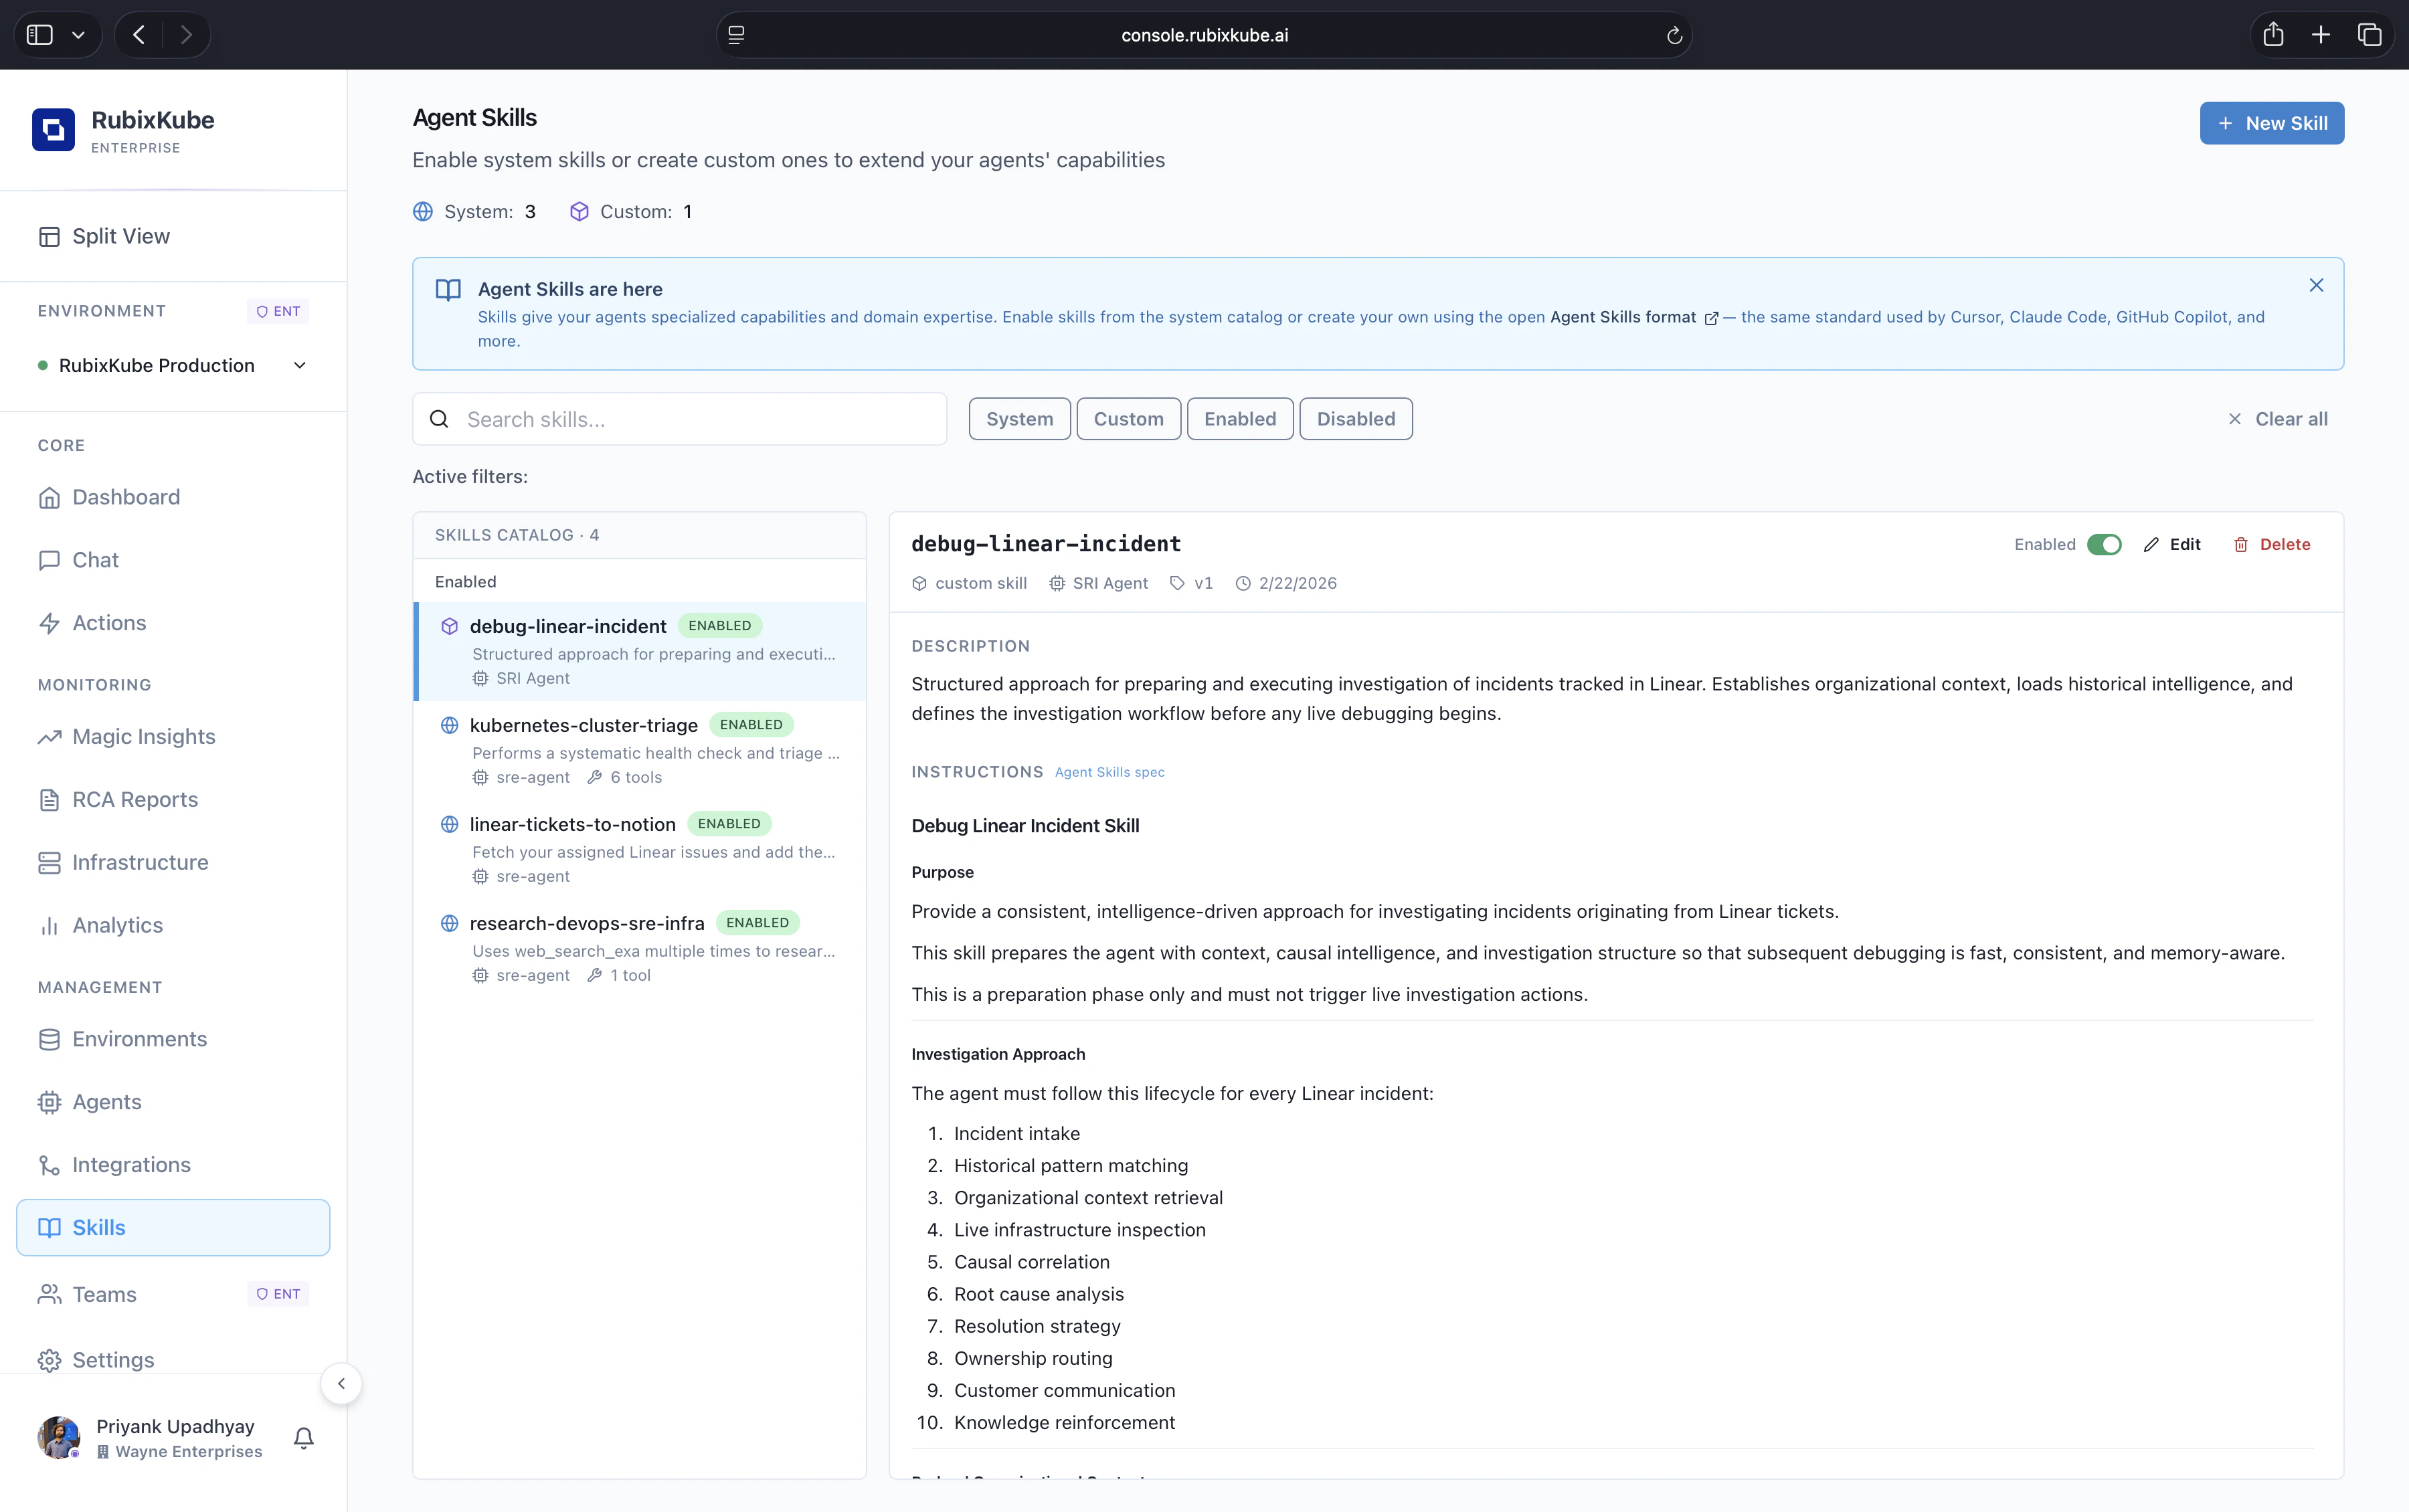
Skills Page Overview
When you open Skills from the left sidebar, you’ll see:- Skill counts — Total System and Custom skills at a glance
- Filter tabs — Switch between System, Custom, Enabled, and Disabled views
- Search bar — Find skills by name or description
- Skills catalog — List of all available skills with status badges
- + New Skill button — Create a custom skill (top-right corner)
First time here? A banner at the top introduces Agent Skills and links to the open Agent Skills format documentation.
Browsing Skills
Filter Tabs
Use the filter tabs above the catalog to narrow your view:| Filter | Shows |
|---|---|
| System | Pre-built skills maintained by RubixKube |
| Custom | Skills created by your team |
| Enabled | All currently active skills |
| Disabled | Skills that are available but not active |
Skill Cards
Each skill in the catalog shows:- Name with an ENABLED or DISABLED badge
- Brief description of what the skill does
- Agent assignment (
sre-agent) - Tool count — how many tools the skill uses
Viewing Skill Details
Click on any skill in the catalog to see its full details in the right panel: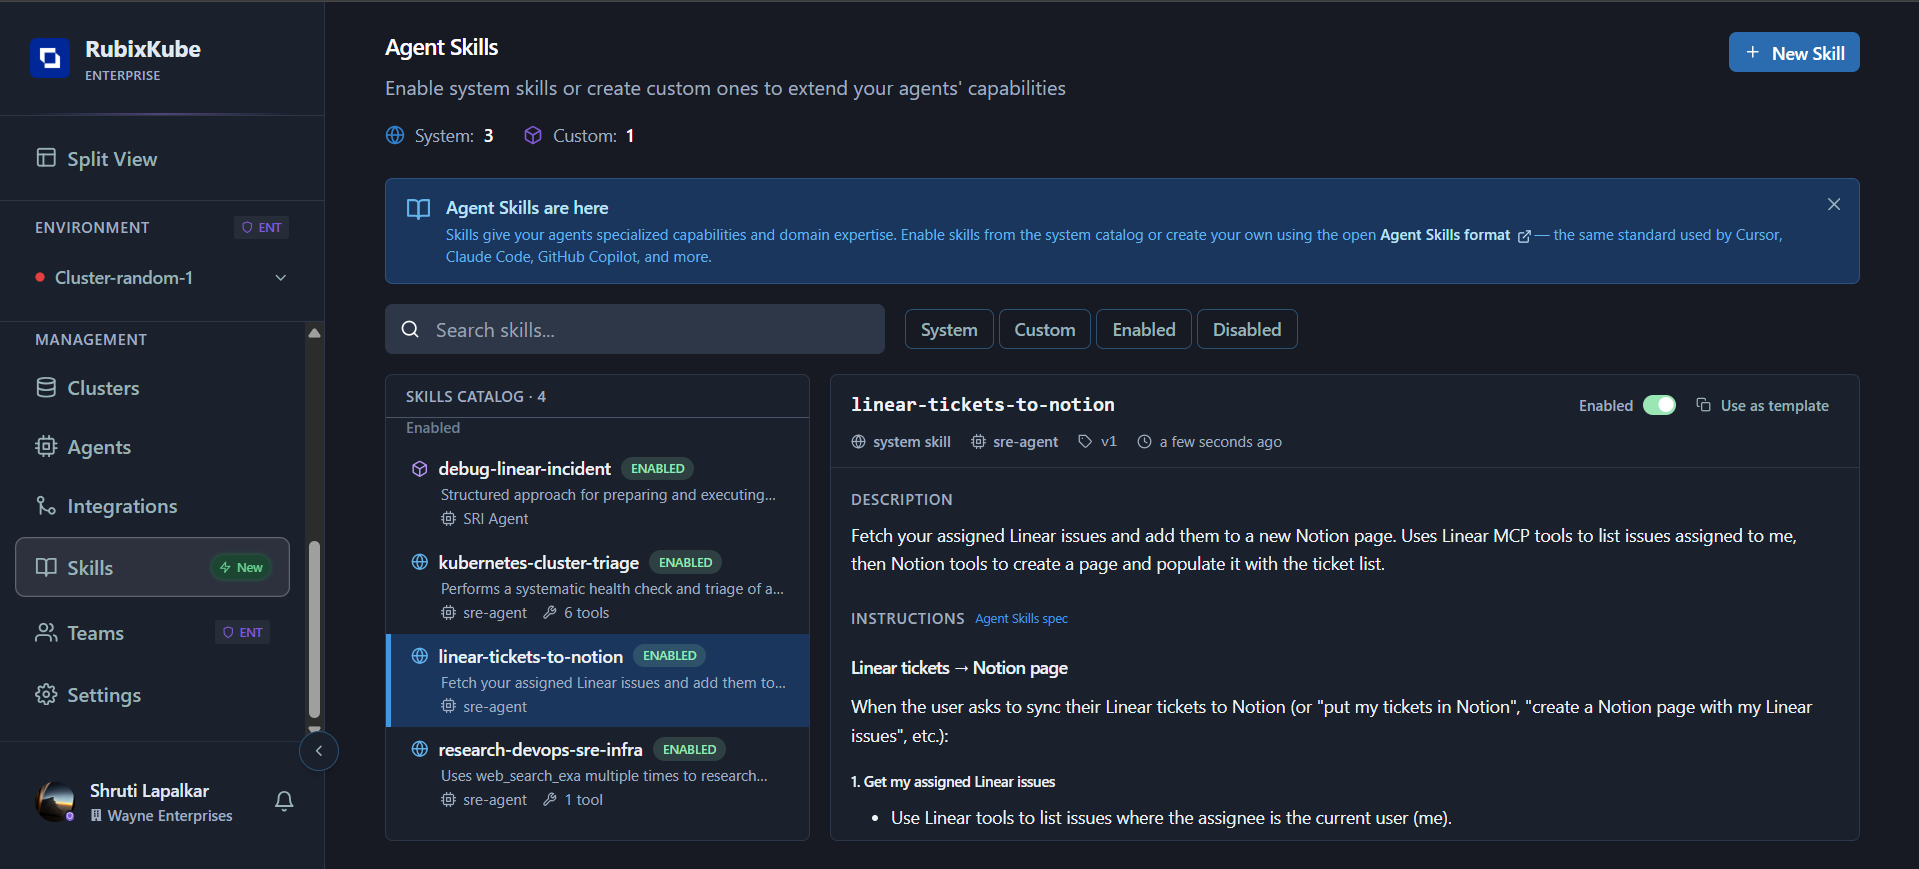
- Skill type —
system skillorcustom - Agent — Which agent uses this skill (currently
sre-agent) - Version — Skill version number
- Last updated — When the skill was last modified
- Enabled toggle — Enable or disable the skill for your tenant
- Use as template — Create a custom skill based on this one
- Description — Full description of the skill’s purpose
- Instructions — The step-by-step workflow the agent follows, including which tools to use at each step
Enabling and Disabling Skills
Enable a Skill
To make a skill available to the SRI Agent:- Navigate to the Skills page
- Find the skill you want to enable in the catalog
- Click on the skill to open its detail panel
- Toggle the Enabled switch to on
Disable a Skill
To stop a skill from being used:- Open the skill’s detail panel
- Toggle the Enabled switch to off
Creating Custom Skills
You can create custom skills in two ways: from scratch or from a template.Option 1: Create from Scratch
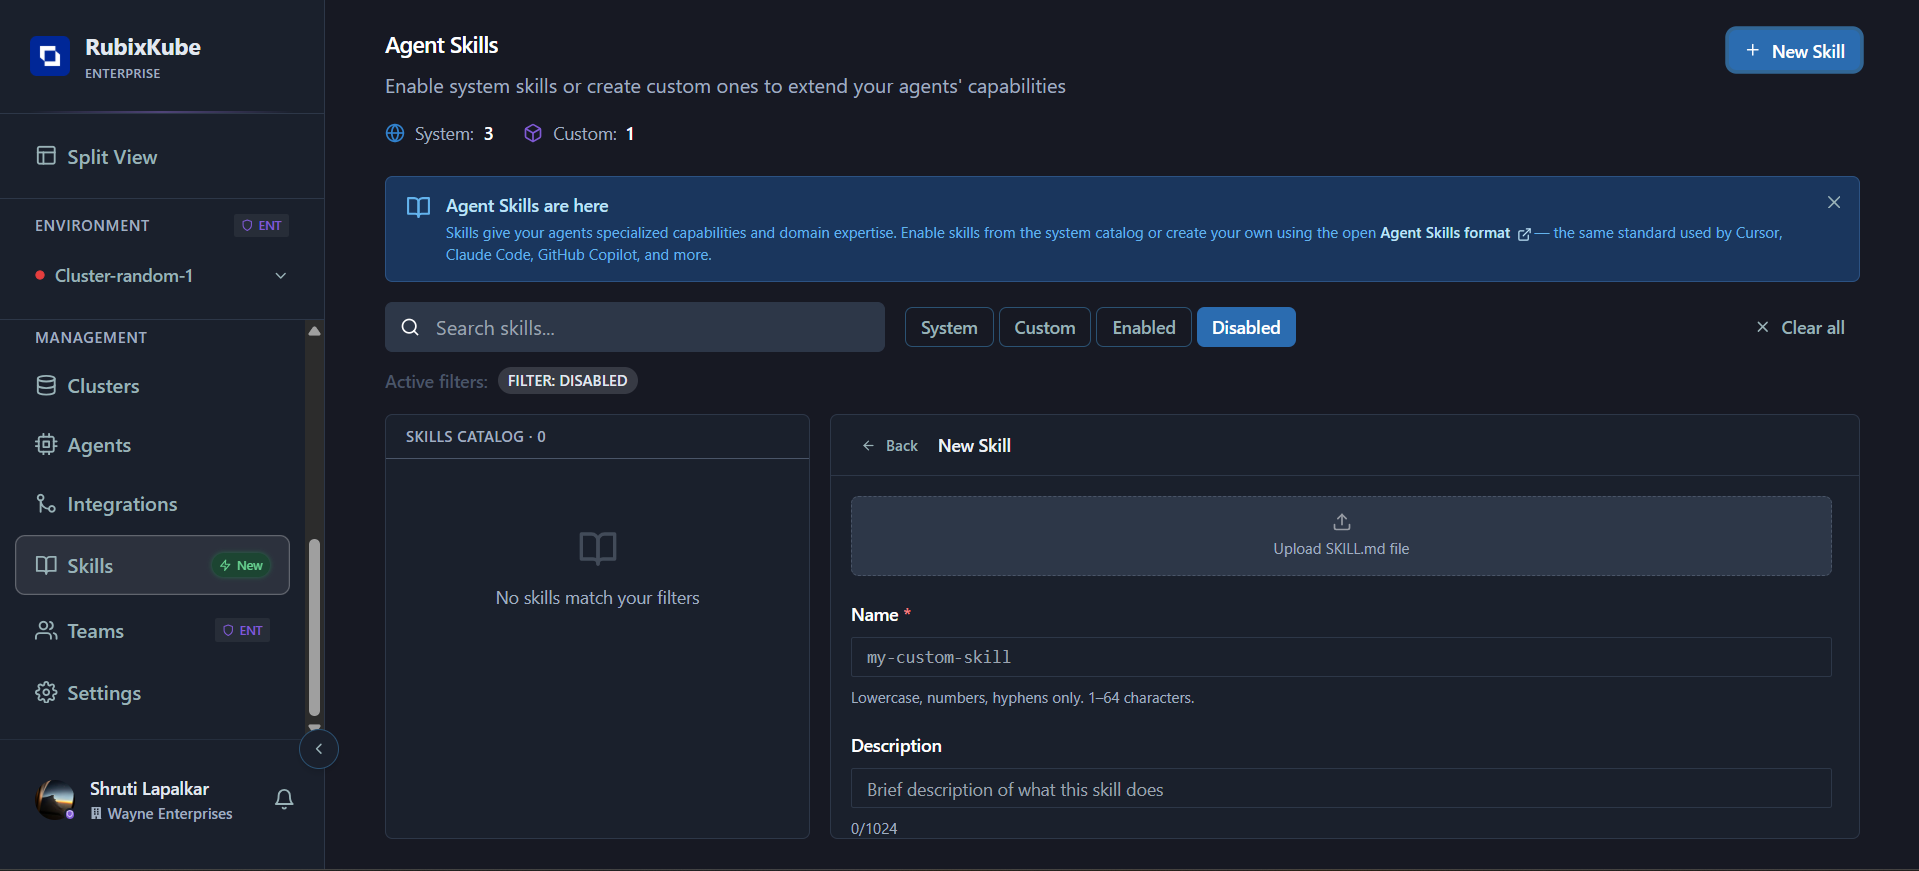
Upload or Fill In
You have two options:
- Upload a SKILL.md file — Drag and drop a skill file that follows the open Agent Skills format. The fields will be auto-populated.
- Fill in manually — Enter the skill details directly in the form.
Enter Skill Details
Fill in the following fields:
| Field | Description | Rules |
|---|---|---|
| Name | Unique skill identifier | Lowercase, numbers, hyphens only. 1–64 characters |
| Description | What the skill does | Up to 1024 characters |
| Agent | Which agent will use this skill | Select SRI Agent from the dropdown |
| Allowed Tools | Tools this skill can use | Comma-separated tool names. Leave empty for all tools |
| Instructions | Step-by-step workflow | The detailed instructions the agent will follow |
Select the Agent
From the Agent dropdown, select SRI Agent. This is currently the only agent available for skill assignment.
Option 2: Create from Template
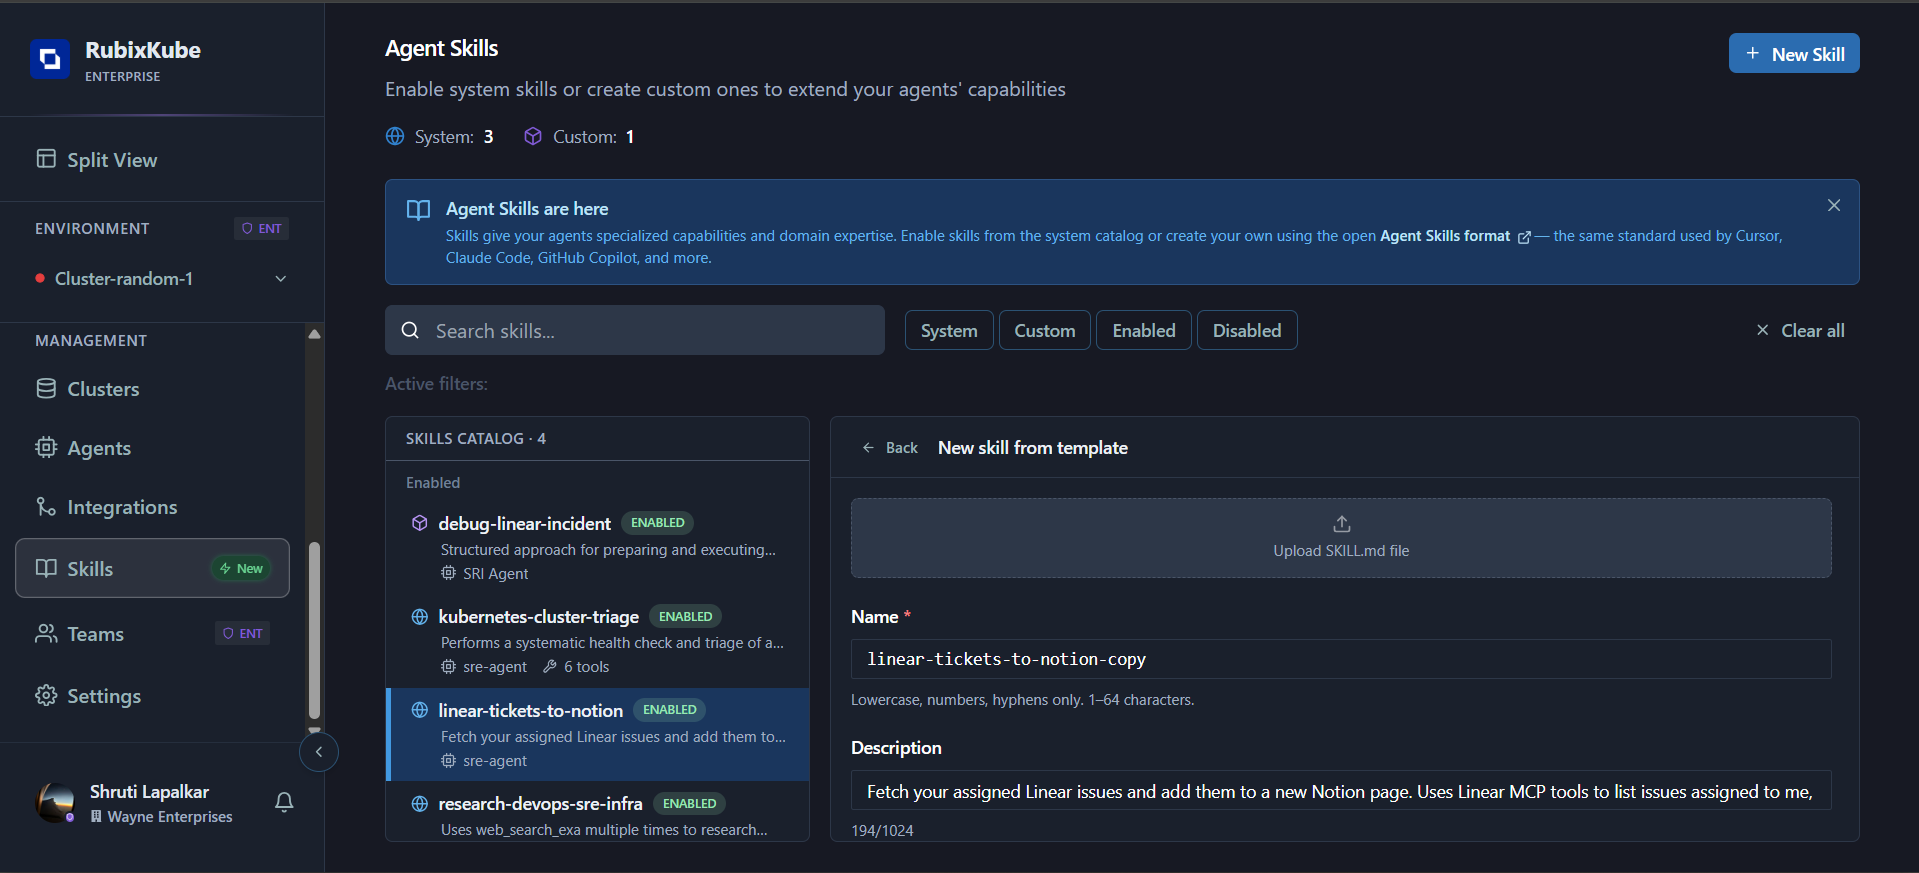
Customize
The form opens pre-populated with the system skill’s details. Modify the name, description, instructions, and allowed tools to match your requirements.
Editing Custom Skills
You can edit any custom skill after it has been created. System skills cannot be edited directly — use “Use as template” to create an editable copy instead.Click Edit
Click the “Edit” button in the top-right of the detail panel. The skill form opens pre-populated with the current values.
Update the Fields
Modify any of the editable fields:
| Field | Description |
|---|---|
| Name | Unique skill identifier (lowercase, numbers, hyphens) |
| Description | What the skill does and when to use it |
| Agent | Which agent will use this skill (SRI Agent) |
| Allowed Tools | Comma-separated tool names the skill can use |
| Instructions | Step-by-step workflow the agent follows |
Agent Selection
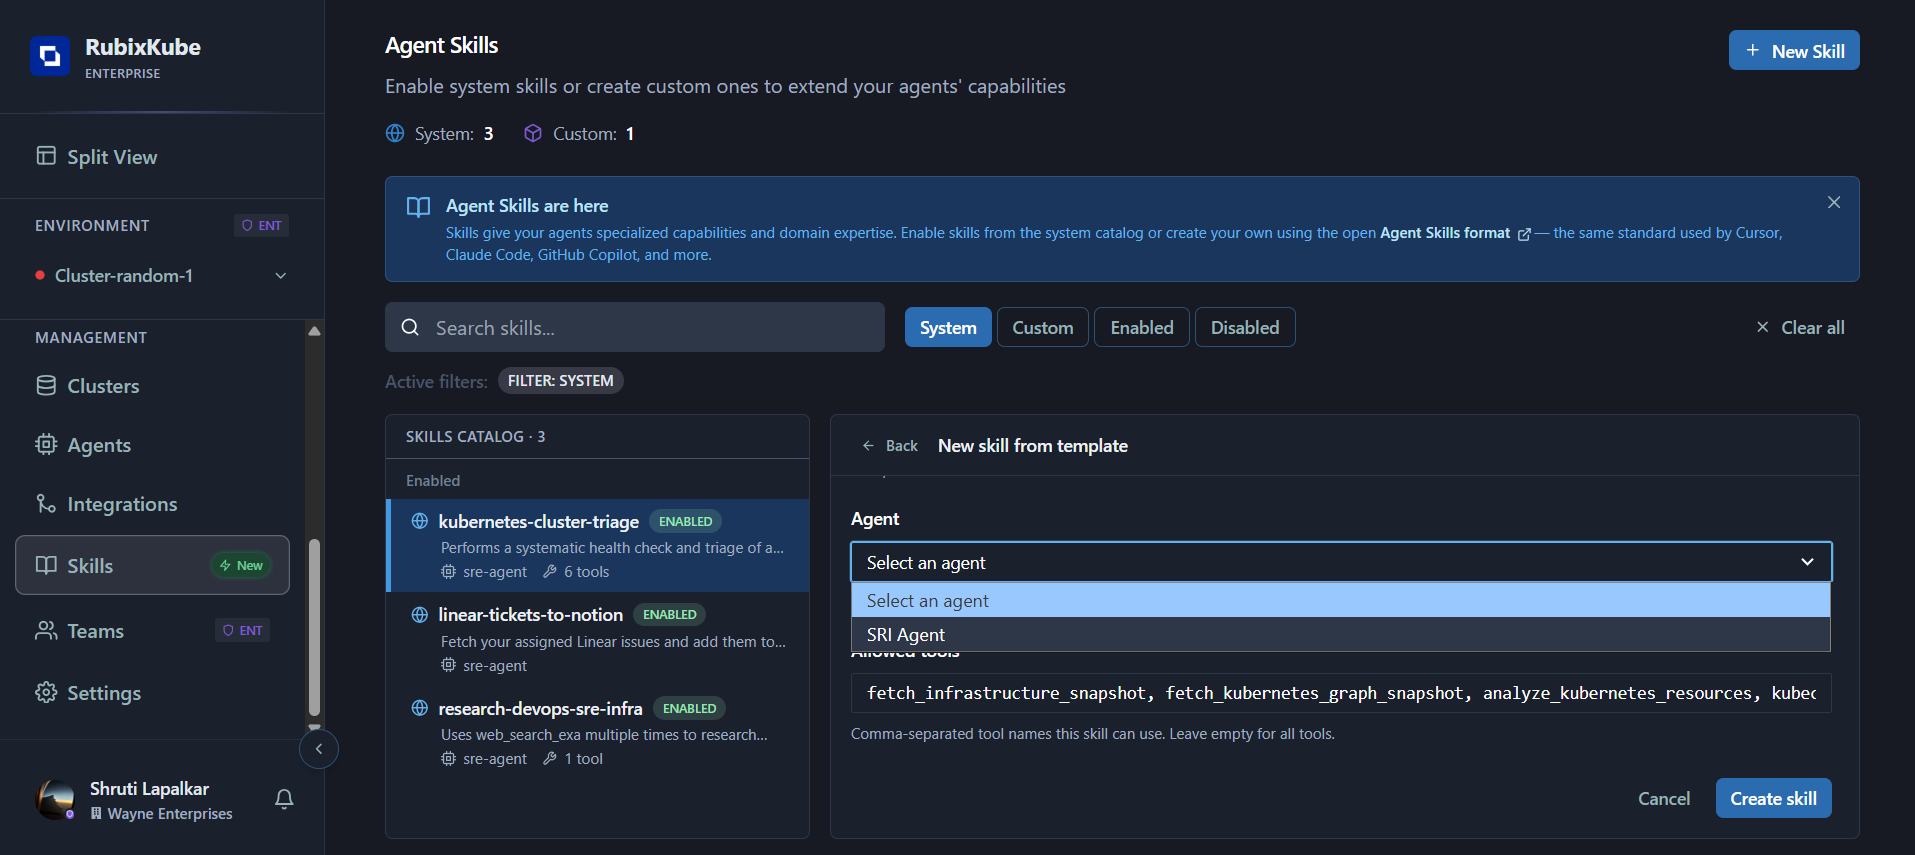
Allowed Tools
When creating a skill, you can specify which tools the skill is designed to use:- Comma-separated list — Enter tool names separated by commas (e.g.,
fetch_infrastructure_snapshot, fetch_kubernetes_logs, analyze_kubernetes_resources) - Leave empty — If left empty, the skill can reference all available tools
Common tools include:
fetch_infrastructure_snapshot, fetch_kubernetes_graph_snapshot, analyze_kubernetes_resources, kubectl_describe_tool, fetch_kubernetes_logs, fetch_kubernetes_metricsSkill Format & Validation
RubixKube validates all skills against the open Agent Skills specification. When you create or update a skill — whether through the console form or by uploading aSKILL.md file — the following rules are enforced.
SKILL.md File Format
If you’re uploading a skill file, it must follow the standardSKILL.md format with YAML frontmatter and a markdown body:
Field Validation Rules
Name
Name
| Rule | Details |
|---|---|
| Required | Must be a non-empty string |
| Length | 1–64 characters |
| Characters | Lowercase letters, numbers, and hyphens only (a-z, 0-9, -) |
| No leading/trailing hyphens | Cannot start or end with - |
| No consecutive hyphens | Cannot contain -- |
Description
Description
| Rule | Details |
|---|---|
| Required | Must be a non-empty string |
| Length | 1–1024 characters |
| Best practice | Describe both what the skill does and when to use it. Include keywords that help the SRI Agent match user queries to this skill |
Instructions
Instructions
| Rule | Details |
|---|---|
| Required | Must be a non-empty string |
| Length | Max 16,384 characters (16 KB) |
| Best practice | Use clear step-by-step structure. Specify which tool to use at each step |
Allowed Tools
Allowed Tools
| Rule | Details |
|---|---|
| Optional | Can be left empty (skill can reference all available tools) |
| Format | Comma-separated tool names in the console, or space-delimited in SKILL.md frontmatter |
Compatibility (optional)
Compatibility (optional)
| Rule | Details |
|---|---|
| Optional | Only include if your skill has specific environment requirements |
| Type | Must be a string |
| Length | Max 500 characters |
Metadata (optional)
Metadata (optional)
| Rule | Details |
|---|---|
| Max keys | 50 |
| Key length | Max 64 characters per key |
| Value length | Max 1000 characters per string value |
Allowed Frontmatter Fields
Only the following fields are recognized in theSKILL.md frontmatter:
| Field | Required | Description |
|---|---|---|
name | ✅ | Unique skill identifier |
description | ✅ | What the skill does and when to use it |
allowed-tools | ❌ | Tools this skill is designed to use |
license | ❌ | License applied to the skill |
compatibility | ❌ | Environment requirements |
metadata | ❌ | Custom key-value pairs |
RubixKube follows the open Agent Skills specification from Anthropic. You can validate your
SKILL.md files locally using the skills-ref reference library.How Skills Get Triggered
Skills can be triggered in two ways through Chat: automatically by intent matching, or explicitly using the@ mention.
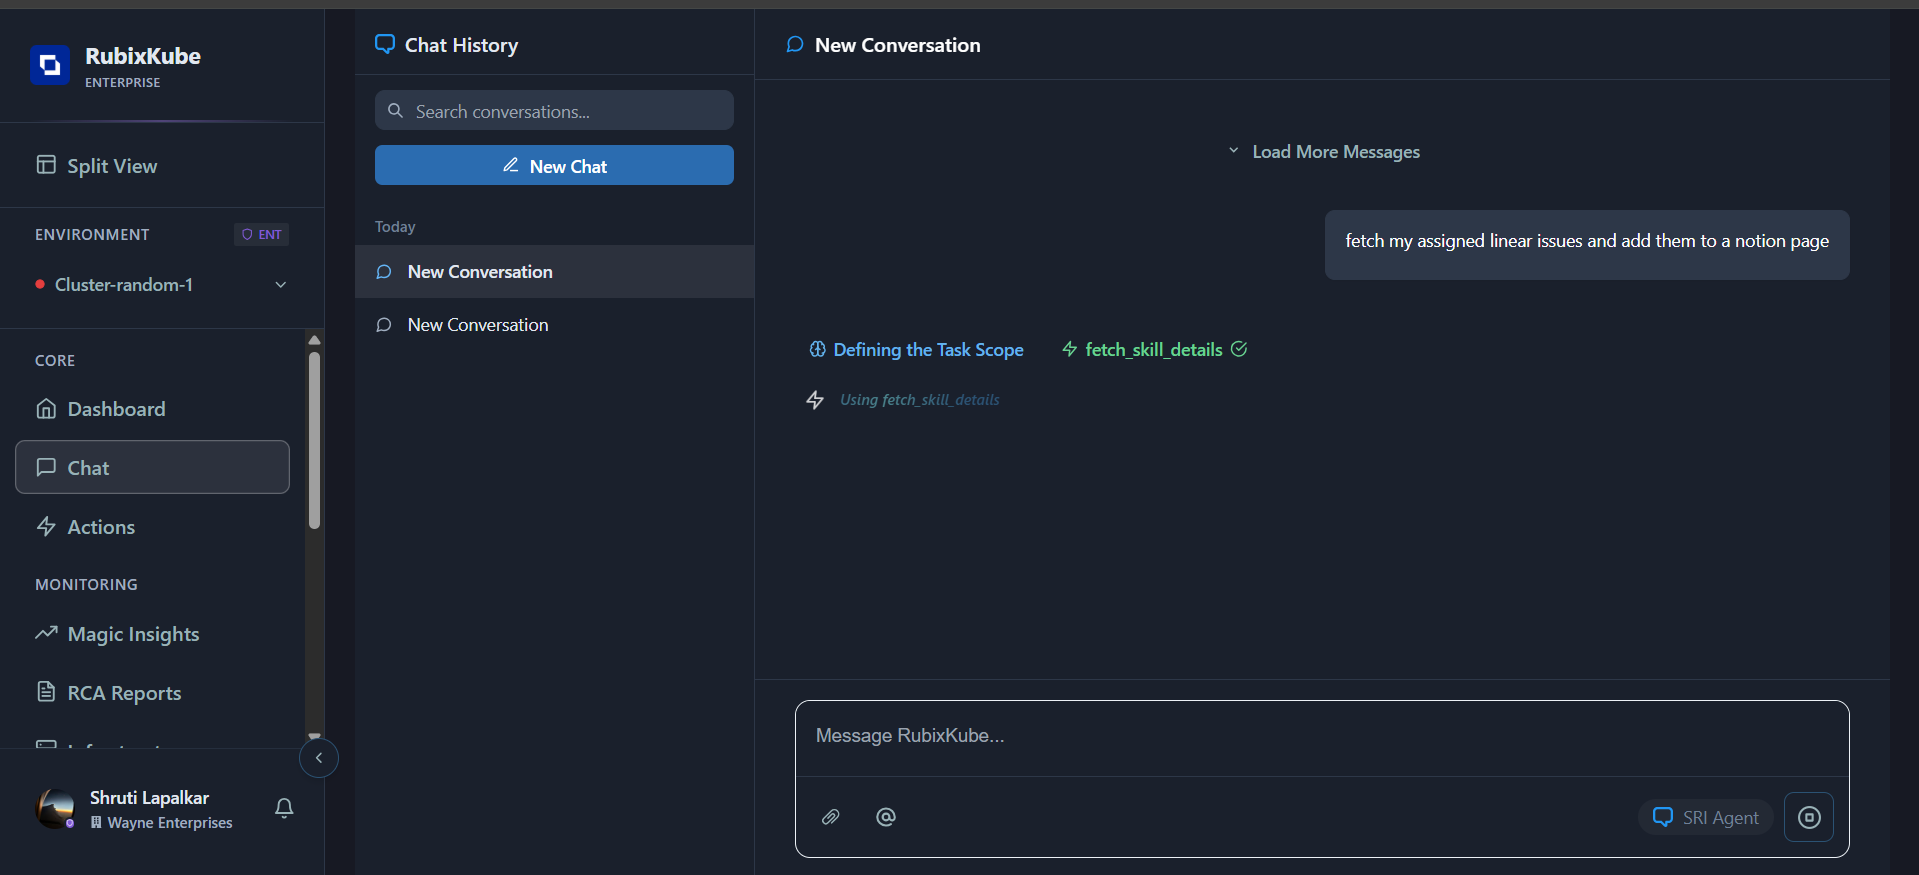
Automatic Matching
When you ask the SRI Agent a question, it silently compares your intent against all enabled skills. If a match is found, the agent loads and follows that skill’s instructions — no special syntax needed. For example:- Asking “What’s wrong with my cluster?” → triggers kubernetes-cluster-triage
- Asking “Put my Linear tickets in Notion” → triggers linear-tickets-to-notion
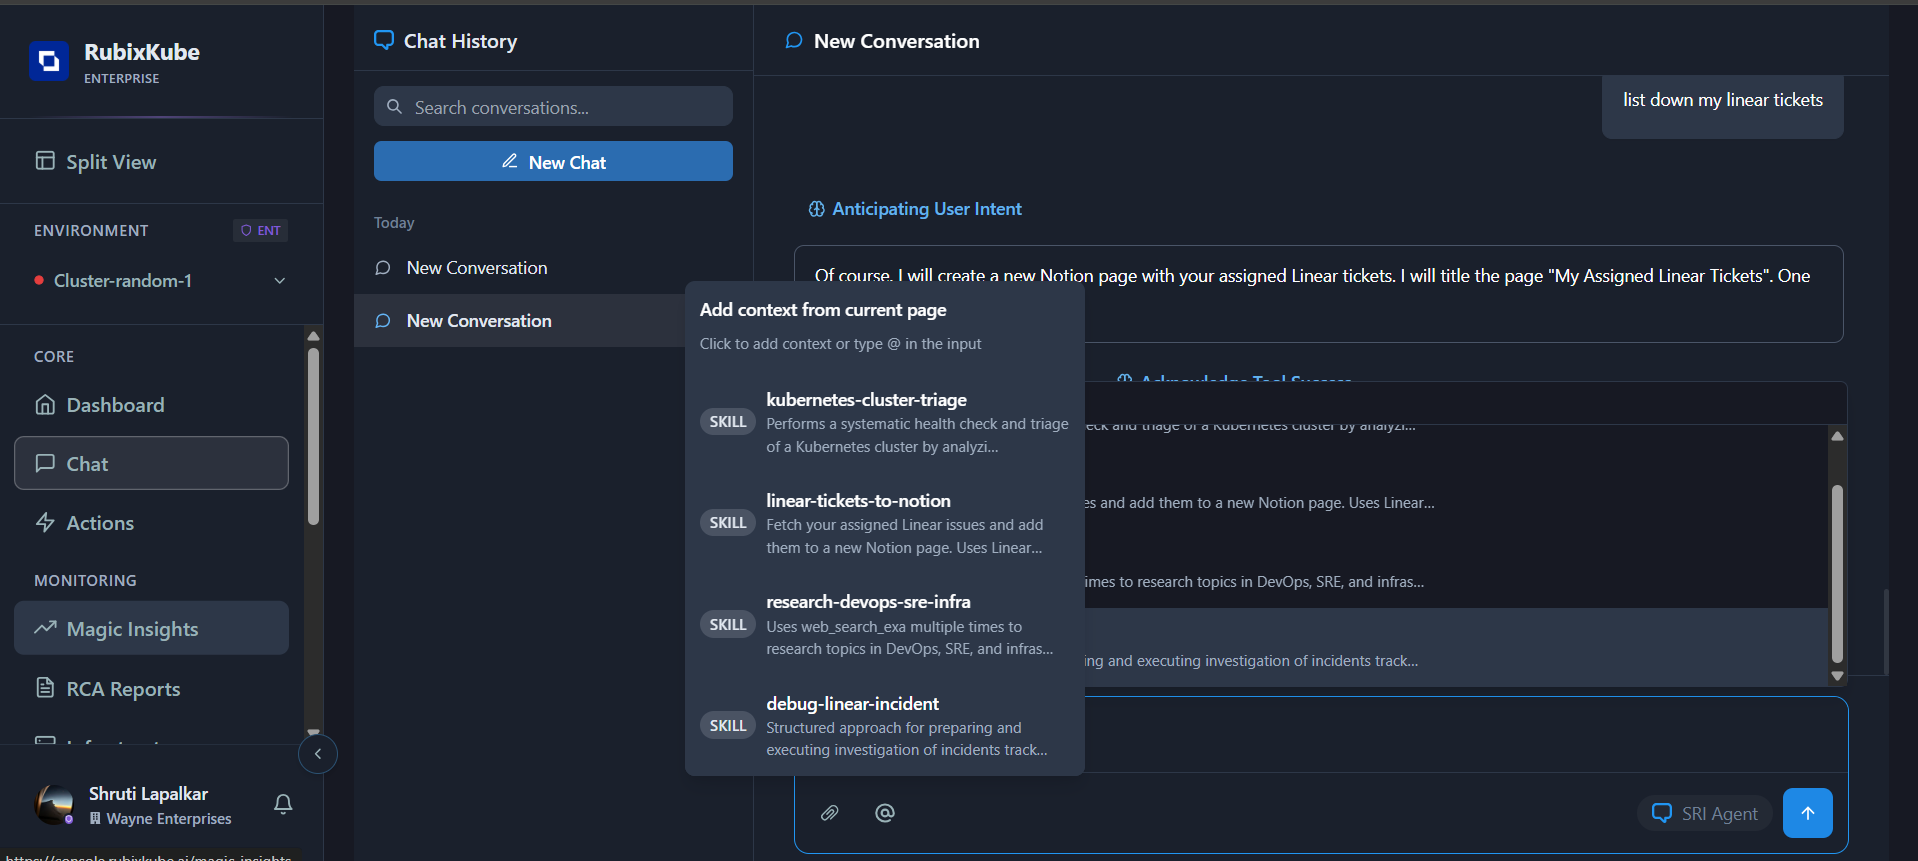
Explicit @ Mention
You can also invoke a skill directly by typing@ in the Chat input. This opens a context menu listing all enabled skills — click the one you want, then type your message.
Skill Execution
Once a skill is triggered (by either method), the SRI Agent:- Loads the skill’s detailed instructions
- Executes each step using the specified tools (you’ll see
fetch_skill_detailsin the Chat activity) - Returns structured results in your conversation
You don’t need to mention the skill by name when using automatic matching — the SRI Agent infers the match from context. Use
@ when you want to be explicit.System Skills Reference
RubixKube includes the following pre-built system skills:| Skill | Description | Tools |
|---|---|---|
| kubernetes-cluster-triage | Systematic health check and triage of a Kubernetes cluster — analyzes infrastructure, identifies unhealthy resources, gathers diagnostics | 6 tools |
| linear-tickets-to-notion | Fetches assigned Linear issues and adds them to a new Notion page using Linear and Notion MCP tools | sre-agent |
| research-devops-sre-infra | Uses web search to research DevOps, SRE, and infrastructure topics | 1 tool |
What You Learned
- How to browse and filter skills in the catalog
- How to view skill details including description, instructions, and tools
- How to enable and disable skills
- How to create custom skills from scratch or from a template
- How skills get triggered through Chat
- The system skills available out of the box
Next: Using Settings
Related Guides
- Using Agents & Tools — Monitor agent health and capabilities
- Skills Concepts, how skills work and why they matter
- Dashboard — Your command center for infrastructure health
- Integrations — Connect external tools and services
Need Help?
Contact Support
Email: connect@rubixkube.ai
Please include your Tenant ID (Settings → Organization), timestamp, and screenshots.
Please include your Tenant ID (Settings → Organization), timestamp, and screenshots.
Troubleshooting Guide
Step-by-step fixes for common issues across Dashboard, Insights, Agents, and more.
FAQ
Answers to common questions about setup, RCA, agents, and docs.
Docs Navigation
Browse all guides to learn workflows and best practices.