> ## Documentation Index
> Fetch the complete documentation index at: https://docs.rubixkube.ai/llms.txt
> Use this file to discover all available pages before exploring further.
# Integrations
> Connect RubixKube with Slack, PagerDuty, Linear, Notion, and your own private tools.
# Managing Integrations
The **Integrations** page connects RubixKube with your existing tools for notifications, metrics, workflows, and agent capabilities.
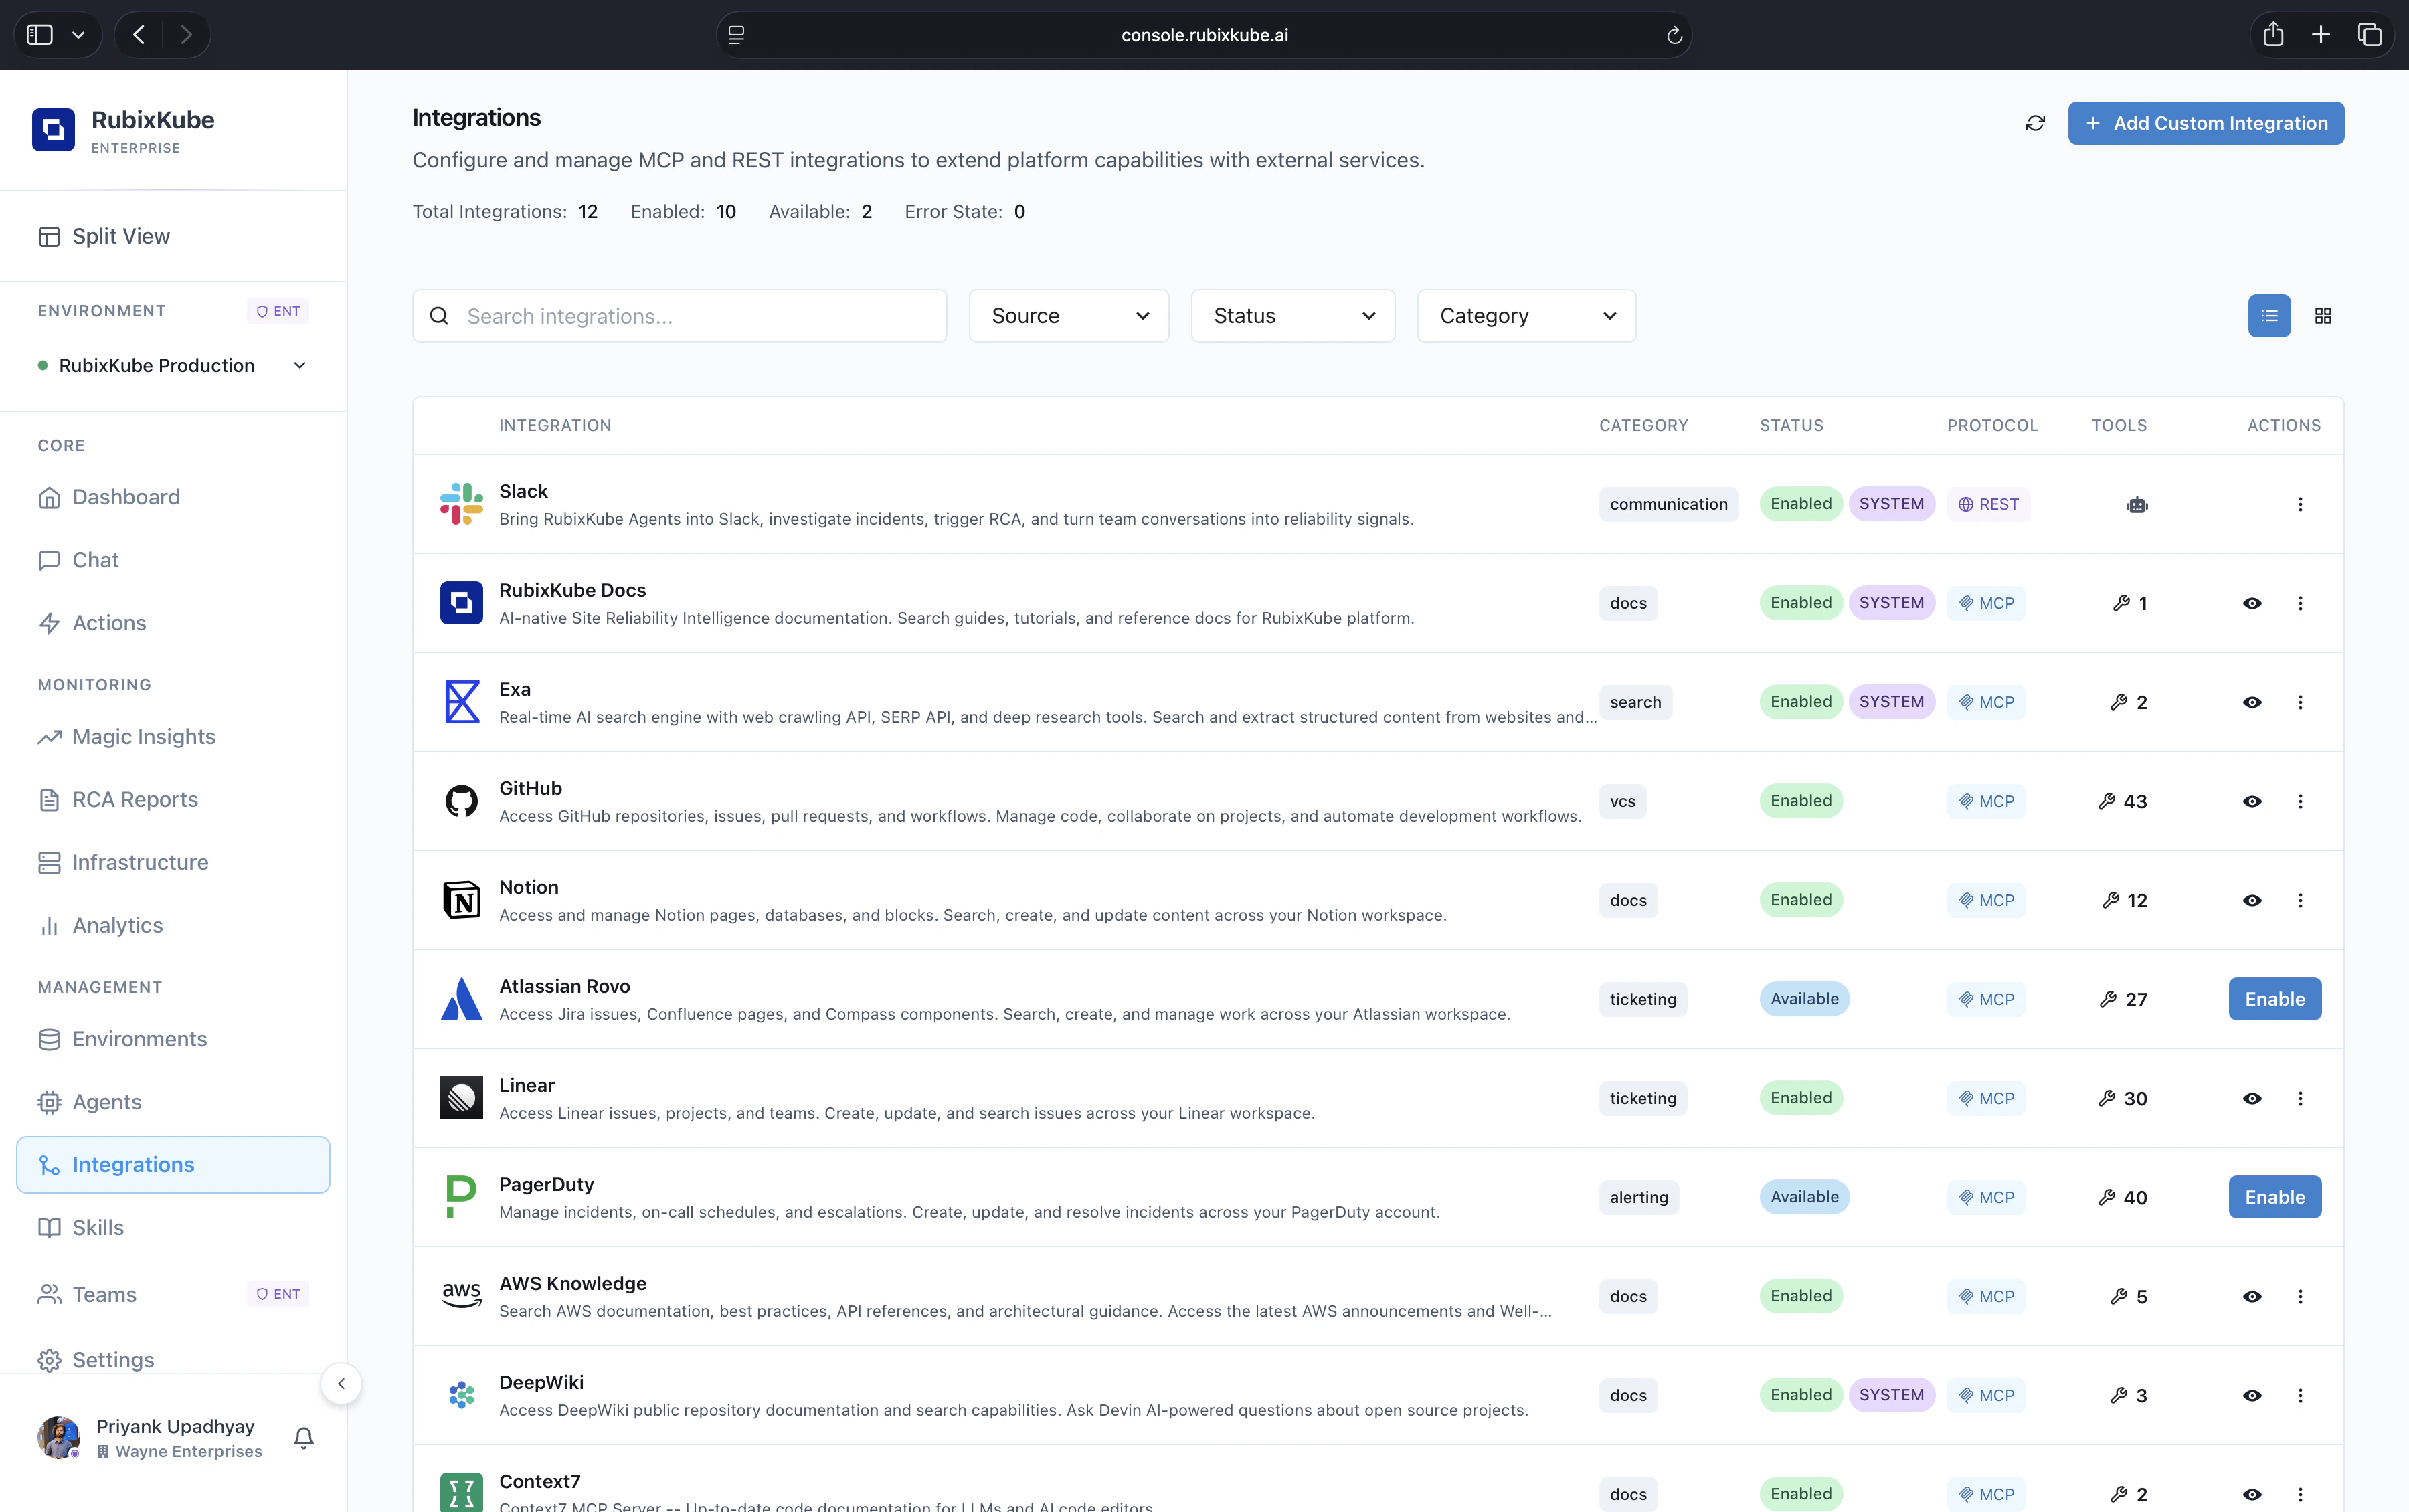 The Integrations catalogue. REST and MCP connections live side by side, with counters, filters, and an "Add Custom Integration" entry point at the top-right.
 Search bar and quick filters by connection state and category
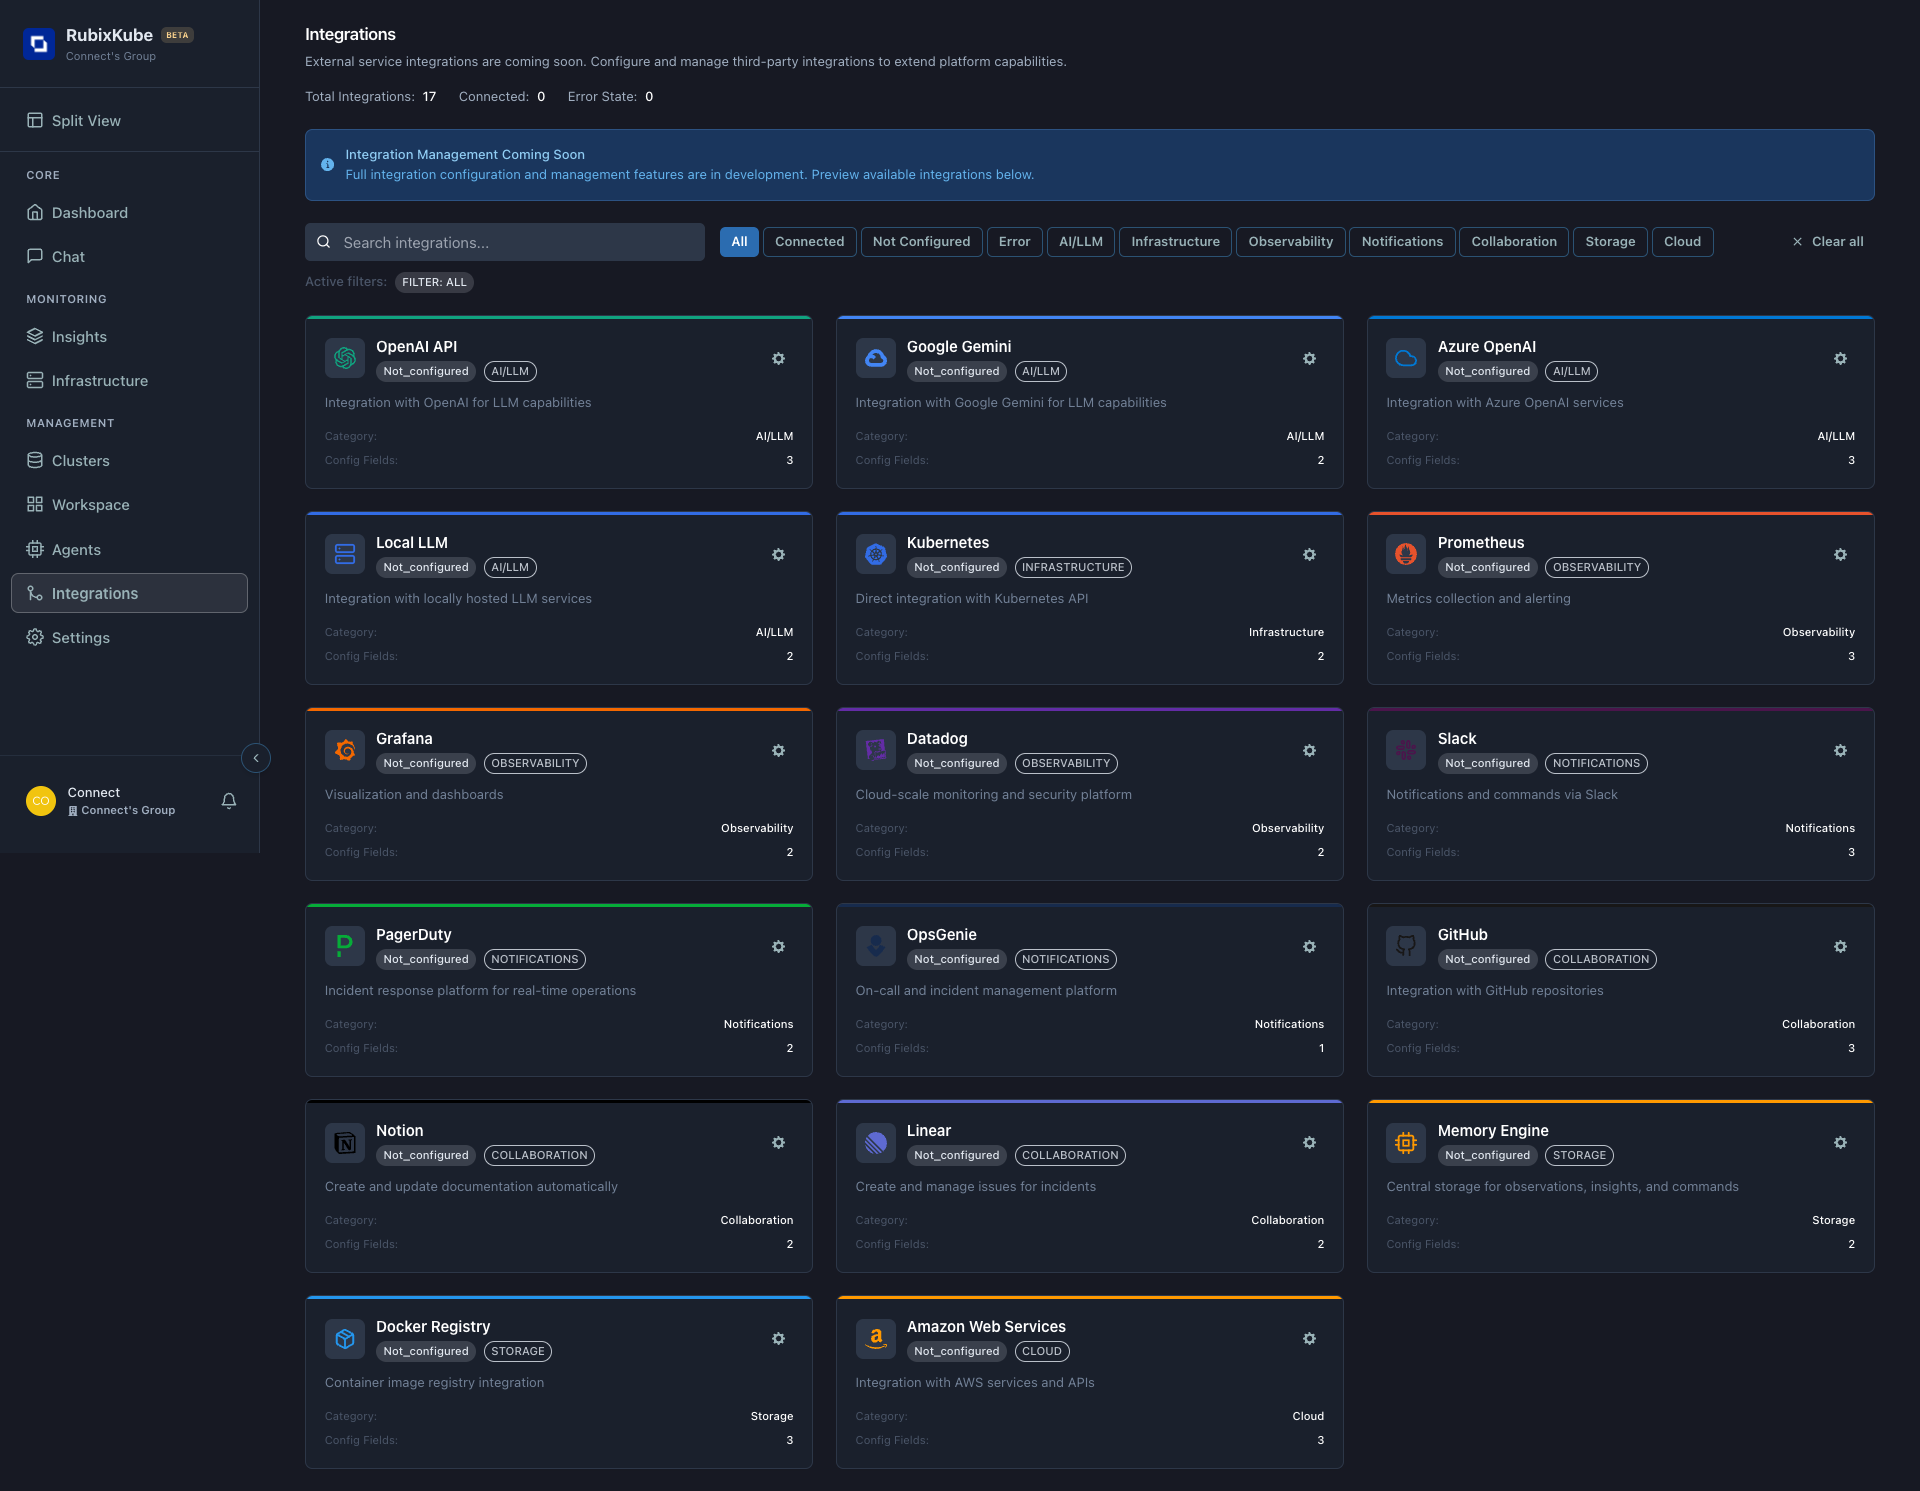 Catalog of available integrations grouped by category
***
## System Integrations
### Get incident notifications in Slack
Setup:
1. Click "Connect Slack"
2. Authorize RubixKube app
3. Select channel for alerts
4. Configure notification rules
### Page on-call for critical incidents
Setup:
1. Click "Connect PagerDuty"
2. Enter integration key
3. Map severity levels
4. Test integration
### Enhanced metrics collection
Setup:
1. Enter Prometheus endpoint
2. Configure scrape interval
3. Verify connection
### Custom integrations
Setup:
1. Add webhook URL
2. Select events to trigger
3. Configure payload format
***
## Notification Rules
**Configure when to be notified:** - HIGH severity incidents only
* All incidents
* RCA report completion
* Cluster disconnection
**Delivery channels:** - Slack messages
* PagerDuty alerts
* Webhook calls
* Email (coming soon)
***
## Custom Integrations
**Custom Integrations** let you connect your own private MCP servers and REST APIs to RubixKube. Once registered, their tools appear automatically alongside system integrations — available to the SRI Agent through Chat, with zero extra plumbing.
Enterprise feature. Custom integrations are available on the Enterprise plan. Free and Pro tenants will see a
Catalog of available integrations grouped by category
***
## System Integrations
### Get incident notifications in Slack
Setup:
1. Click "Connect Slack"
2. Authorize RubixKube app
3. Select channel for alerts
4. Configure notification rules
### Page on-call for critical incidents
Setup:
1. Click "Connect PagerDuty"
2. Enter integration key
3. Map severity levels
4. Test integration
### Enhanced metrics collection
Setup:
1. Enter Prometheus endpoint
2. Configure scrape interval
3. Verify connection
### Custom integrations
Setup:
1. Add webhook URL
2. Select events to trigger
3. Configure payload format
***
## Notification Rules
**Configure when to be notified:** - HIGH severity incidents only
* All incidents
* RCA report completion
* Cluster disconnection
**Delivery channels:** - Slack messages
* PagerDuty alerts
* Webhook calls
* Email (coming soon)
***
## Custom Integrations
**Custom Integrations** let you connect your own private MCP servers and REST APIs to RubixKube. Once registered, their tools appear automatically alongside system integrations — available to the SRI Agent through Chat, with zero extra plumbing.
Enterprise feature. Custom integrations are available on the Enterprise plan. Free and Pro tenants will see a 403 response.
### Two Protocols
Custom integrations support two protocols. Choose based on what you're connecting:
Connect a private **Model Context Protocol** server — the same standard used by system integrations. Supports SSE, HTTP, and stdio transports.
**Best for:** MCP-native tools like Linear, GitHub, Notion, or any server that speaks MCP.
Expose any **REST API** as agent tools by defining tool schemas and HTTP mappings. No MCP server needed — RubixKube translates tool calls to HTTP requests.
**Best for:** Internal APIs, ticketing systems, CMDB, or any service with a REST endpoint.
***
### Adding an MCP Server
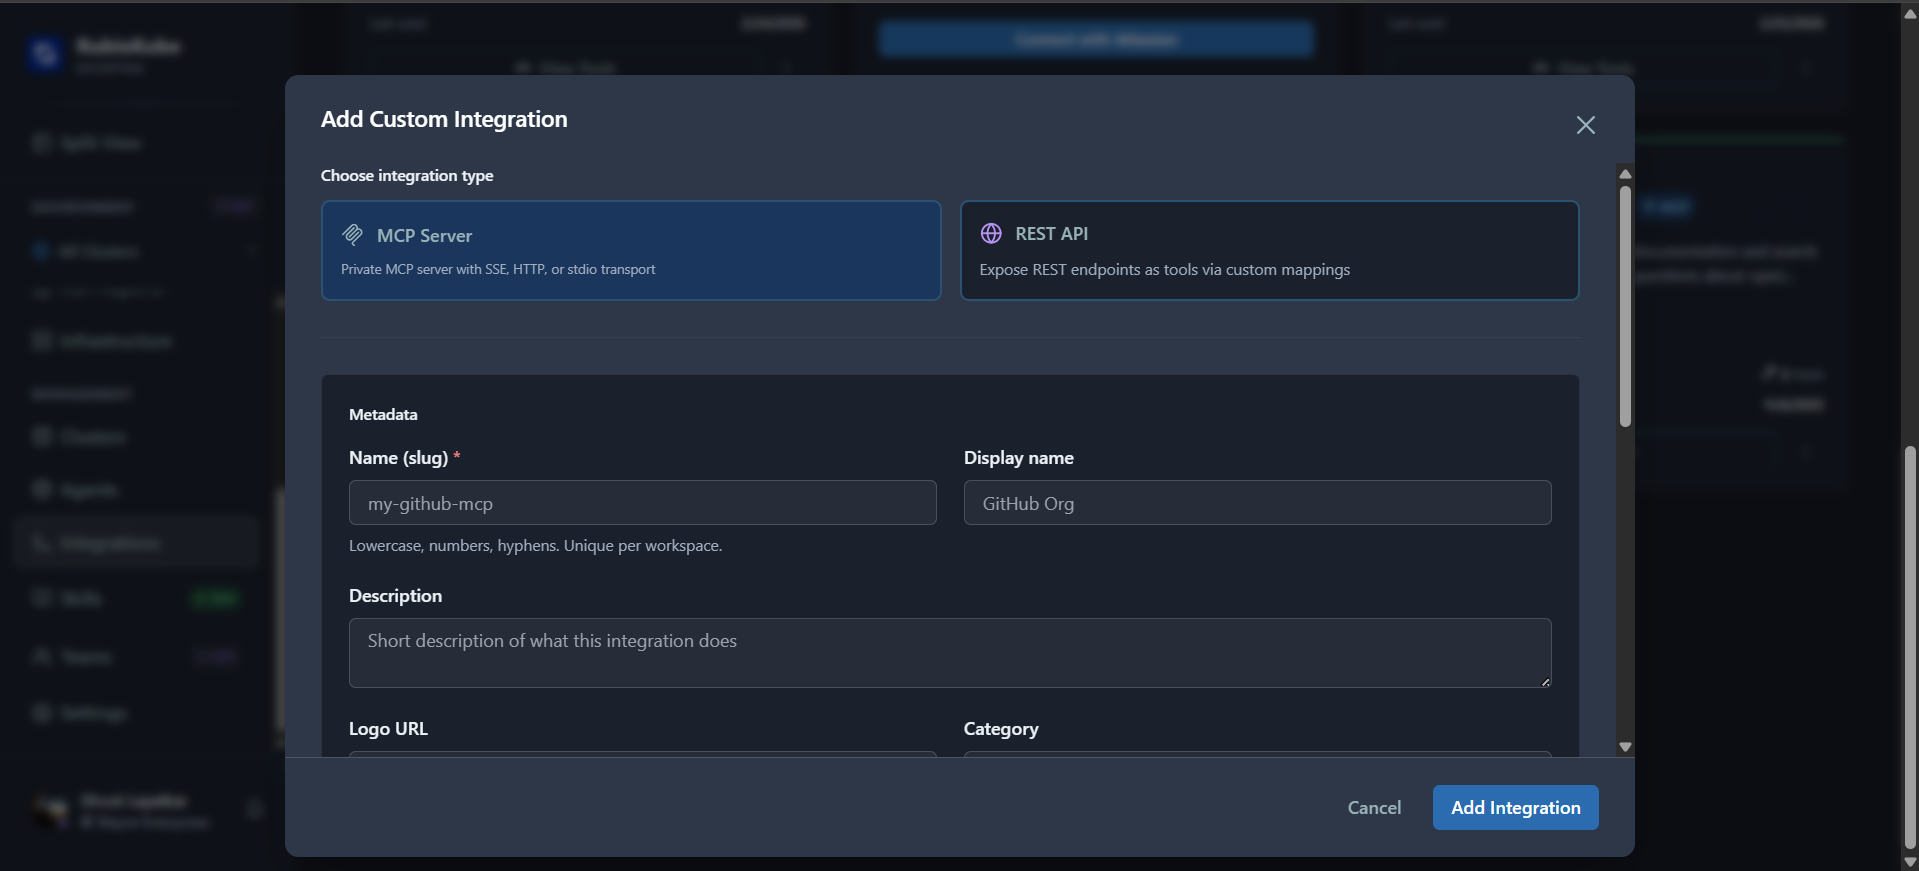 The Add Custom Integration dialog — choose MCP Server or REST API, then fill in the metadata
Navigate to **Integrations** in the left sidebar.
Select **MCP Server** as the protocol type.
| Field | Description |
| ---------------- | ---------------------------------------------------------------------- |
| **Name** | URL-safe slug (lowercase, numbers, hyphens). Unique per tenant |
| **Display Name** | Human-readable name for the integration card |
| **Description** | Short description of what this integration does |
| **Logo URL** | URL to the integration's logo/icon |
| **Category** | Category for filtering (e.g., `version_control`, `project_management`) |
The Add Custom Integration dialog — choose MCP Server or REST API, then fill in the metadata
Navigate to **Integrations** in the left sidebar.
Select **MCP Server** as the protocol type.
| Field | Description |
| ---------------- | ---------------------------------------------------------------------- |
| **Name** | URL-safe slug (lowercase, numbers, hyphens). Unique per tenant |
| **Display Name** | Human-readable name for the integration card |
| **Description** | Short description of what this integration does |
| **Logo URL** | URL to the integration's logo/icon |
| **Category** | Category for filtering (e.g., `version_control`, `project_management`) |
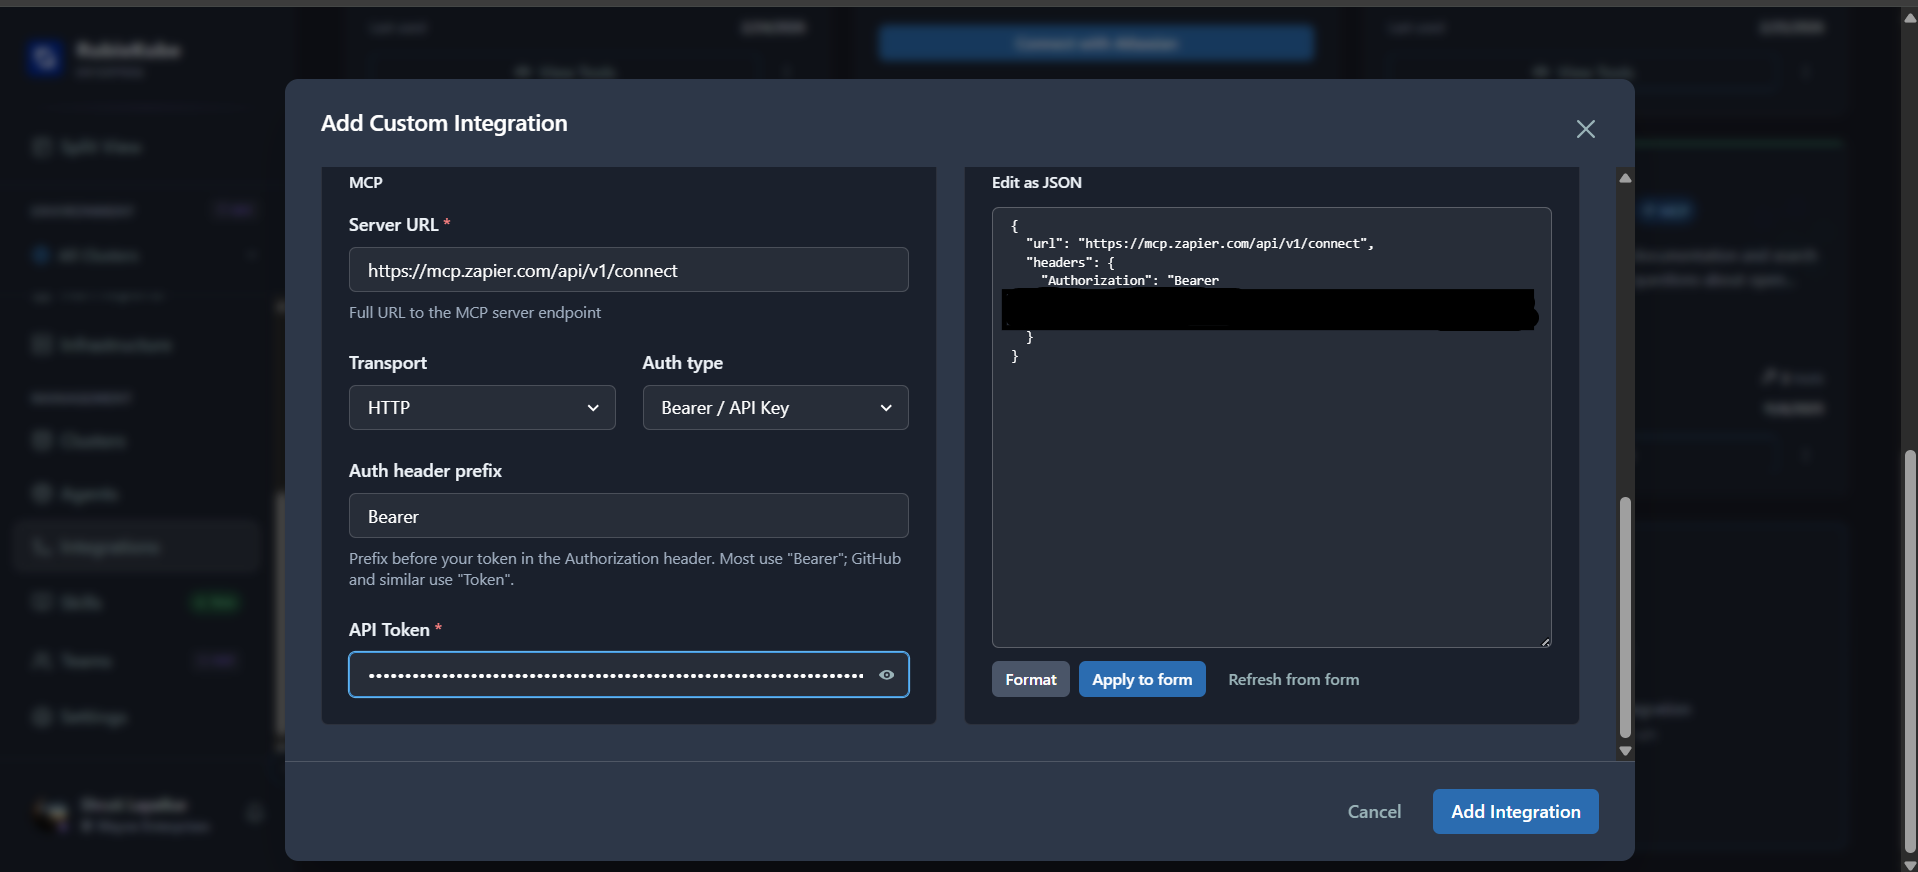 MCP connection settings — Server URL, transport protocol, auth type, and API token
| Field | Description |
| ---------------------- | ------------------------------------------------------------------------------------ |
| **Server URL** | Full URL to your MCP server endpoint (e.g., `https://mcp.zapier.com/api/v1/connect`) |
| **Transport** | `SSE` (default), `HTTP`, or `stdio` |
| **Auth Type** | `Bearer / API Key` (default), `OAuth2`, or `None` |
| **Auth Header Prefix** | Prefix for the Authorization header (default `Bearer`, use `Token` for GitHub) |
| **API Token** | Your authentication token |
You can also use the **Edit as JSON** panel on the right to configure the integration directly as JSON.
After creation, click **Test** to verify connectivity. The test negotiates the MCP handshake with the remote server and updates the health status on the card.
Once connected, the integration's tools appear immediately in the MCP gateway — no restart or config change needed.
***
### Adding a REST API
MCP connection settings — Server URL, transport protocol, auth type, and API token
| Field | Description |
| ---------------------- | ------------------------------------------------------------------------------------ |
| **Server URL** | Full URL to your MCP server endpoint (e.g., `https://mcp.zapier.com/api/v1/connect`) |
| **Transport** | `SSE` (default), `HTTP`, or `stdio` |
| **Auth Type** | `Bearer / API Key` (default), `OAuth2`, or `None` |
| **Auth Header Prefix** | Prefix for the Authorization header (default `Bearer`, use `Token` for GitHub) |
| **API Token** | Your authentication token |
You can also use the **Edit as JSON** panel on the right to configure the integration directly as JSON.
After creation, click **Test** to verify connectivity. The test negotiates the MCP handshake with the remote server and updates the health status on the card.
Once connected, the integration's tools appear immediately in the MCP gateway — no restart or config change needed.
***
### Adding a REST API
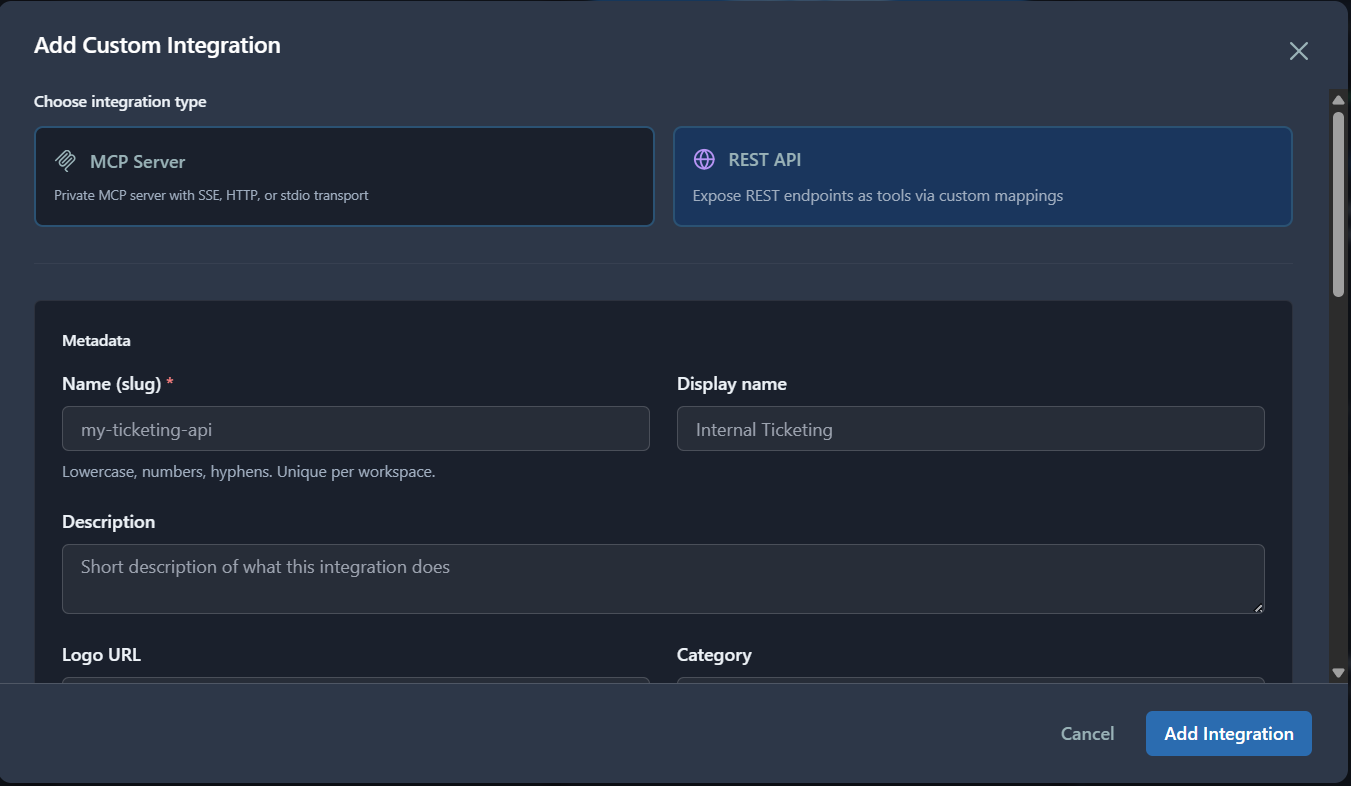 Adding a REST API integration — select REST API, then fill in metadata
Choose **REST API** as the protocol type when adding a new custom integration.
Fill in the metadata fields: **Name** (slug), **Display Name**, **Description**, **Logo URL**, and **Category**.
Adding a REST API integration — select REST API, then fill in metadata
Choose **REST API** as the protocol type when adding a new custom integration.
Fill in the metadata fields: **Name** (slug), **Display Name**, **Description**, **Logo URL**, and **Category**.
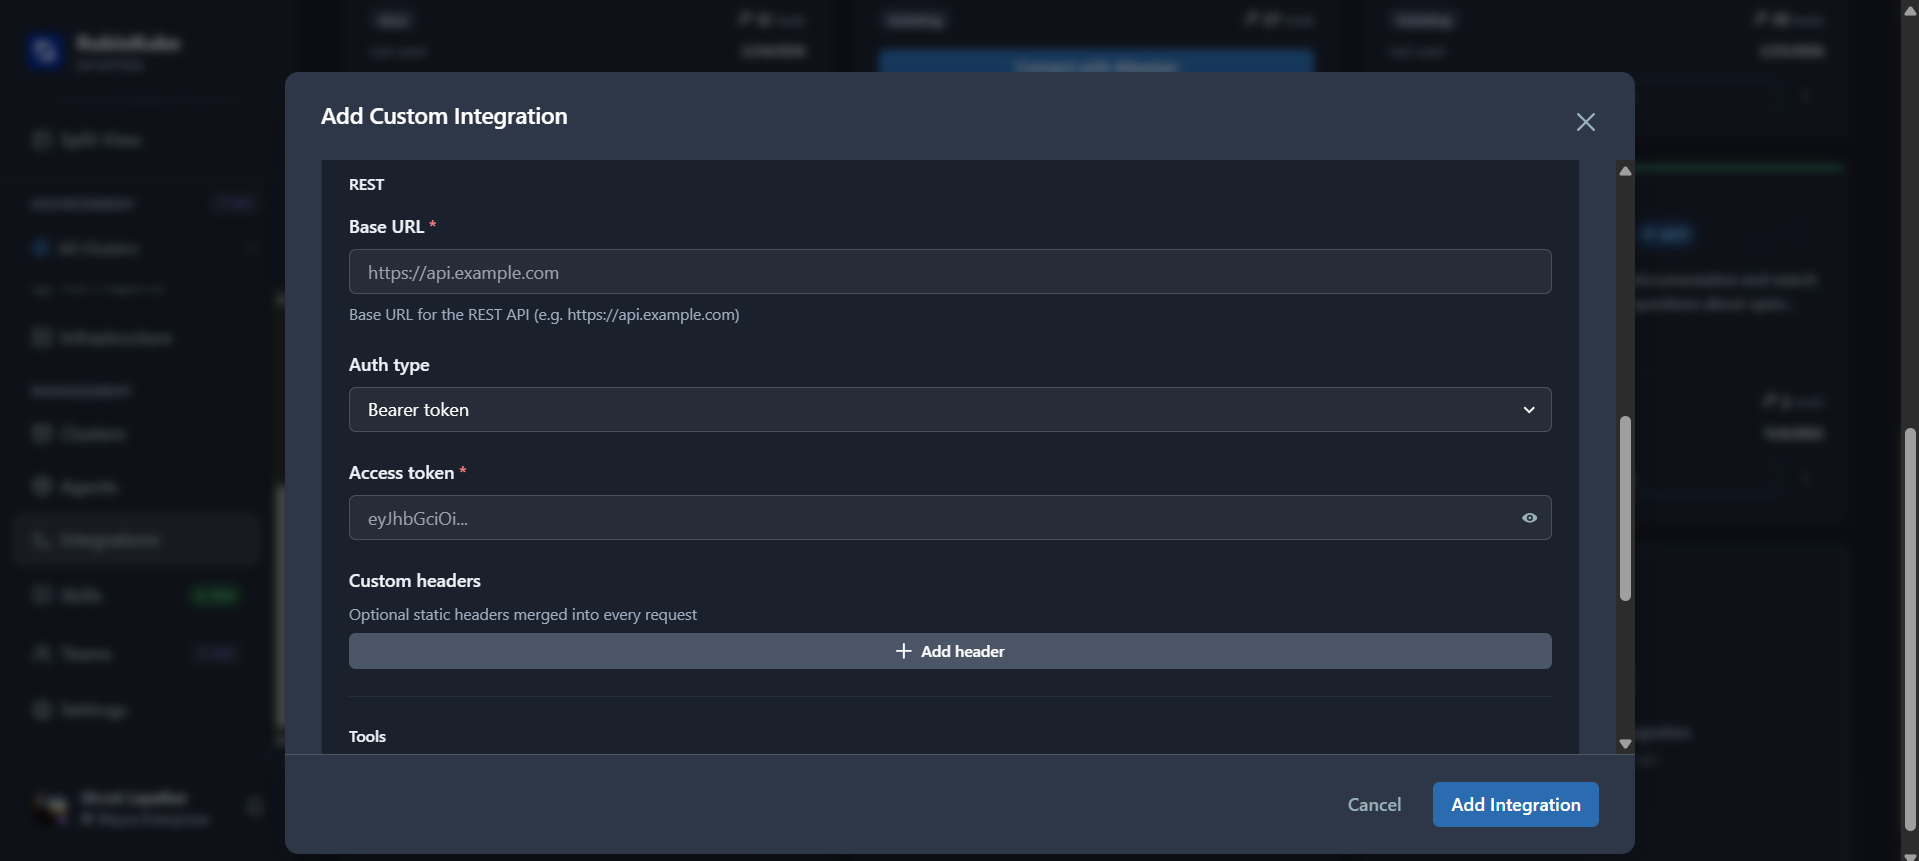 REST connection settings — Base URL, auth type, access token, and custom headers
| Field | Description |
| ------------------ | -------------------------------------------------------------------------- |
| **Base URL** | Base URL of your API (e.g., `https://api.example.com`) |
| **Auth Type** | `Bearer token`, `API Key`, `Basic auth`, or `OAuth2` |
| **Access Token** | Your authentication token (encrypted at rest) |
| **Custom Headers** | Optional static headers merged into every request (click **+ Add header**) |
REST connection settings — Base URL, auth type, access token, and custom headers
| Field | Description |
| ------------------ | -------------------------------------------------------------------------- |
| **Base URL** | Base URL of your API (e.g., `https://api.example.com`) |
| **Auth Type** | `Bearer token`, `API Key`, `Basic auth`, or `OAuth2` |
| **Access Token** | Your authentication token (encrypted at rest) |
| **Custom Headers** | Optional static headers merged into every request (click **+ Add header**) |
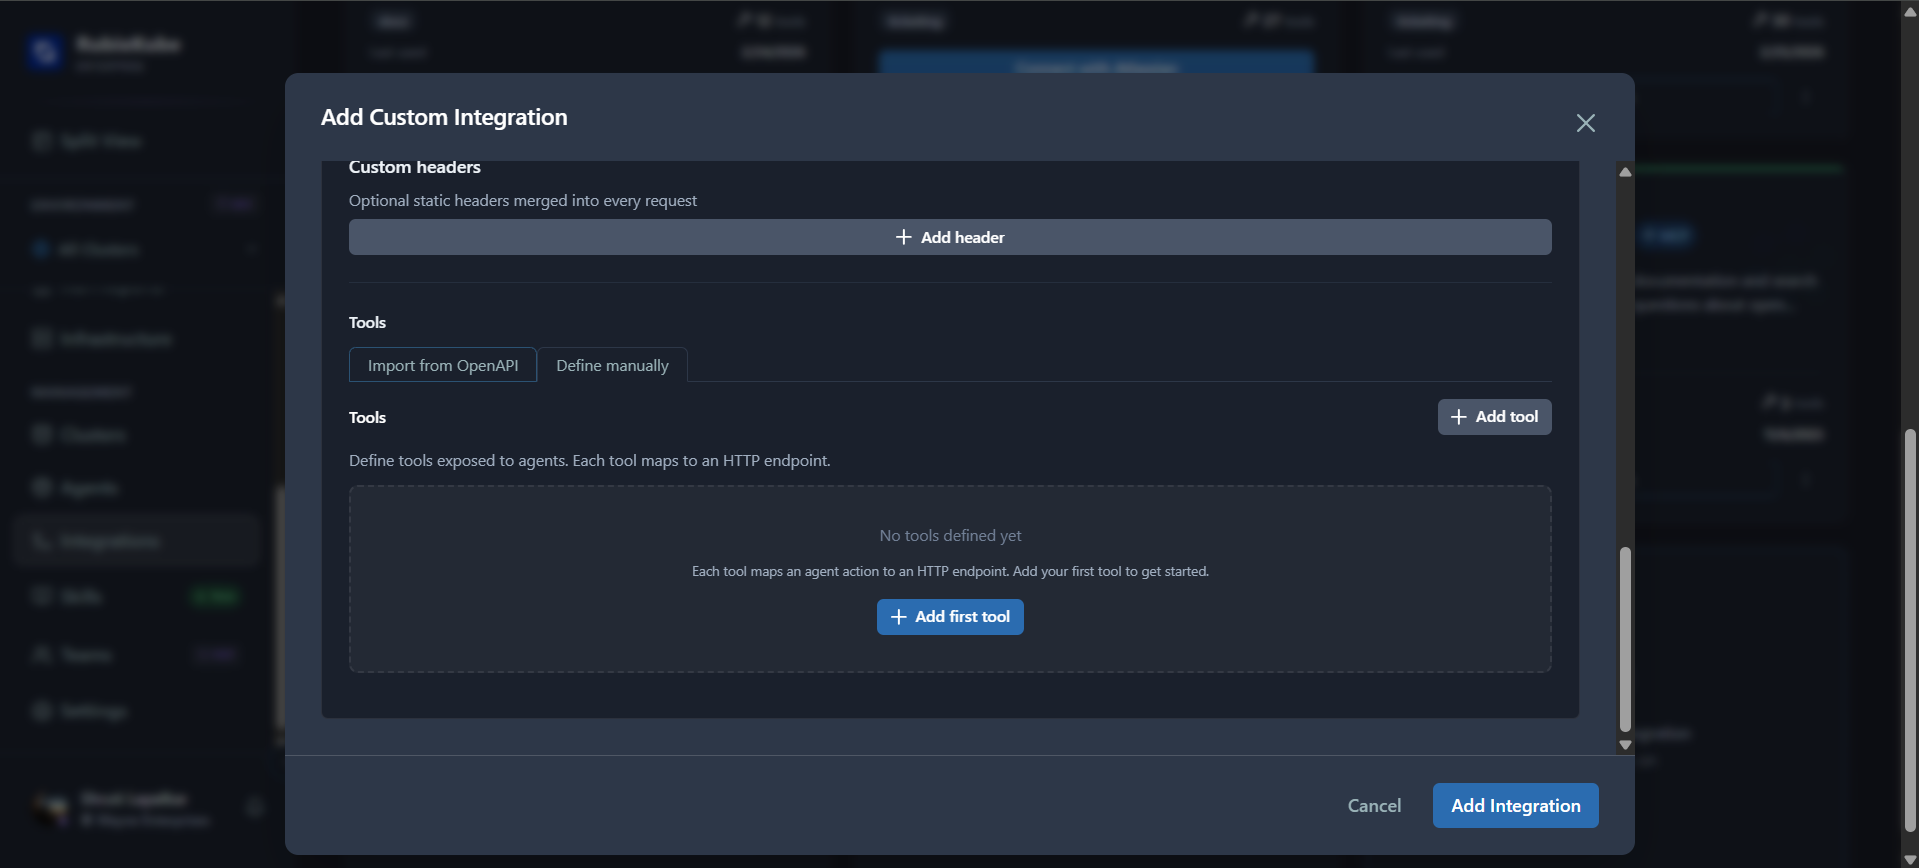 Tools section — import from an OpenAPI spec or define tools manually
You can define tools in two ways:
* **Import from OpenAPI** — upload or paste an OpenAPI 3.x / Swagger 2.0 spec to auto-generate tools
* **Define manually** — click **+ Add tool** to define each tool by hand
Each tool represents one API operation the SRI Agent can invoke:
| Field | Description |
| --------------- | ----------------------------------------------------------------------------- |
| **Name** | Tool identifier (e.g., `list_tickets`) |
| **Description** | What the tool does — the agent reads this to decide when to use it |
| **HTTP Method** | `GET`, `POST`, `PUT`, `PATCH`, or `DELETE` |
| **Path** | URL path appended to the base URL (supports path params like `/tickets/{id}`) |
| **Parameters** | Query params and body params for the tool |
Click **Add Integration** and then **Test** to verify connectivity. REST tests probe common health paths (`/healthcheck`, `/healthz`, `/health`, `/ping`) with your configured auth.
***
### Managing Custom Integrations
#### Editing a Custom Integration
To update an existing custom integration, click on its card in the catalog and select **Edit**. The edit form opens pre-populated with all current values.
Find the custom integration in the catalog. Custom integrations are shown in the **Custom** section below the system integrations.
Click the **Edit** (pencil) icon on the integration card or in the settings panel.
Modify any metadata or connection settings:
| Field | Behavior on Update |
| ---------------------------------------------------- | --------------------------------------------------------------------------------------------------------- |
| **Display Name / Description / Logo URL / Category** | Updated immediately |
| **Connection settings (URL, transport, etc.)** | Replaced on save |
| **Credentials (API token, OAuth config)** | Passing new credentials replaces them entirely (re-encrypted). **Omit to preserve existing credentials.** |
| **Tools** | Add, remove, or redefine tool schemas |
Click **Save** to apply. The updated integration takes effect immediately in the MCP gateway.
#### Other Integration Actions
**Disable / Re-enable** — Toggle the integration's status between `active` and `disabled`. Disabled integrations are excluded from the MCP gateway.
**Tool Filtering** — Control which tools are available to agents:
* **Enabled tools** — allowlist of specific tool names. Empty means all tools allowed.
* **Disabled tools** — blocklist applied after the allowlist. If a tool appears in both, it's blocked.
**Delete** — Permanently removes the integration and all associated credentials.
**Test Connection** — Run a health check at any time. Health status is displayed on the integration card with consecutive failure count and last error.
***
### Authentication
Credentials are passed **plaintext on create** — the server encrypts them before storing. They are **always masked** in responses.
```json theme={null}
{
"auth_type": "bearer",
"api_token": "your-token-here"
}
```
For user-facing OAuth flows (e.g., Atlassian, GitHub):
```json theme={null}
{
"auth_type": "oauth2",
"oauth": {
"grant_type": "authorization_code",
"client_id": "your-client-id",
"client_secret": "your-client-secret",
"authorization_url": "https://provider.com/oauth/authorize",
"token_url": "https://provider.com/oauth/token",
"scope": "read write",
"use_pkce": true
}
}
```
Or with **OIDC discovery** (auto-discovers endpoints from issuer URL):
```json theme={null}
{
"auth_type": "oidc",
"oauth": {
"grant_type": "authorization_code",
"client_id": "your-client-id",
"issuer_url": "https://auth.provider.com",
"scope": "openid read:data",
"use_pkce": true
}
}
```
For server-to-server flows:
```json theme={null}
{
"auth_type": "oauth2",
"oauth": {
"grant_type": "client_credentials",
"client_id": "your-client-id",
"client_secret": "your-client-secret",
"token_url": "https://provider.com/oauth/token",
"scope": "api:read api:write"
}
}
```
Set
Tools section — import from an OpenAPI spec or define tools manually
You can define tools in two ways:
* **Import from OpenAPI** — upload or paste an OpenAPI 3.x / Swagger 2.0 spec to auto-generate tools
* **Define manually** — click **+ Add tool** to define each tool by hand
Each tool represents one API operation the SRI Agent can invoke:
| Field | Description |
| --------------- | ----------------------------------------------------------------------------- |
| **Name** | Tool identifier (e.g., `list_tickets`) |
| **Description** | What the tool does — the agent reads this to decide when to use it |
| **HTTP Method** | `GET`, `POST`, `PUT`, `PATCH`, or `DELETE` |
| **Path** | URL path appended to the base URL (supports path params like `/tickets/{id}`) |
| **Parameters** | Query params and body params for the tool |
Click **Add Integration** and then **Test** to verify connectivity. REST tests probe common health paths (`/healthcheck`, `/healthz`, `/health`, `/ping`) with your configured auth.
***
### Managing Custom Integrations
#### Editing a Custom Integration
To update an existing custom integration, click on its card in the catalog and select **Edit**. The edit form opens pre-populated with all current values.
Find the custom integration in the catalog. Custom integrations are shown in the **Custom** section below the system integrations.
Click the **Edit** (pencil) icon on the integration card or in the settings panel.
Modify any metadata or connection settings:
| Field | Behavior on Update |
| ---------------------------------------------------- | --------------------------------------------------------------------------------------------------------- |
| **Display Name / Description / Logo URL / Category** | Updated immediately |
| **Connection settings (URL, transport, etc.)** | Replaced on save |
| **Credentials (API token, OAuth config)** | Passing new credentials replaces them entirely (re-encrypted). **Omit to preserve existing credentials.** |
| **Tools** | Add, remove, or redefine tool schemas |
Click **Save** to apply. The updated integration takes effect immediately in the MCP gateway.
#### Other Integration Actions
**Disable / Re-enable** — Toggle the integration's status between `active` and `disabled`. Disabled integrations are excluded from the MCP gateway.
**Tool Filtering** — Control which tools are available to agents:
* **Enabled tools** — allowlist of specific tool names. Empty means all tools allowed.
* **Disabled tools** — blocklist applied after the allowlist. If a tool appears in both, it's blocked.
**Delete** — Permanently removes the integration and all associated credentials.
**Test Connection** — Run a health check at any time. Health status is displayed on the integration card with consecutive failure count and last error.
***
### Authentication
Credentials are passed **plaintext on create** — the server encrypts them before storing. They are **always masked** in responses.
```json theme={null}
{
"auth_type": "bearer",
"api_token": "your-token-here"
}
```
For user-facing OAuth flows (e.g., Atlassian, GitHub):
```json theme={null}
{
"auth_type": "oauth2",
"oauth": {
"grant_type": "authorization_code",
"client_id": "your-client-id",
"client_secret": "your-client-secret",
"authorization_url": "https://provider.com/oauth/authorize",
"token_url": "https://provider.com/oauth/token",
"scope": "read write",
"use_pkce": true
}
}
```
Or with **OIDC discovery** (auto-discovers endpoints from issuer URL):
```json theme={null}
{
"auth_type": "oidc",
"oauth": {
"grant_type": "authorization_code",
"client_id": "your-client-id",
"issuer_url": "https://auth.provider.com",
"scope": "openid read:data",
"use_pkce": true
}
}
```
For server-to-server flows:
```json theme={null}
{
"auth_type": "oauth2",
"oauth": {
"grant_type": "client_credentials",
"client_id": "your-client-id",
"client_secret": "your-client-secret",
"token_url": "https://provider.com/oauth/token",
"scope": "api:read api:write"
}
}
```
Set auth\_type: "none" and omit credentials entirely.
```json theme={null}
{ "access_token": "eyJhbGciOi..." }
```
Also accepts api\_token or token.
```json theme={null}
{ "api_key": "your-api-key" }
```
```json theme={null}
{ "username": "alice", "password": "s3cr3t" }
```
***
### OAuth Flows
For OAuth-based integrations, RubixKube handles the full authorization code flow:
Register the integration with auth\_type: "oauth2" and your OAuth credentials (client ID, secret, URLs).
Click **Authorize** on the integration card. This opens the OAuth provider's consent page in a popup or redirect.
After you approve, the provider redirects back to RubixKube's callback endpoint. Tokens are automatically encrypted and stored.
Token refresh happens automatically during tool calls. You can also manually trigger a refresh from the integration card to verify token health.
OAuth discovery: RubixKube can auto-discover authorization and token URLs from the MCP server's .well-known/oauth-authorization-server or the standard OIDC .well-known/openid-configuration endpoint.
***
### How Custom Integrations Appear to Agents
Once created, custom integration tools surface automatically in the tenant's MCP gateway alongside system integration tools:
* **Tool discovery** — custom tools appear in `tools/list` and `discover_tools()`
* **Tool execution** — `tools/call` routes to your server or API with the configured auth
* **Namespacing** — tools are namespaced by the integration's `name` slug
There's no difference between a system integration tool and a custom integration tool from the agent's perspective. Both go through the same MCP gateway.
***
### Custom vs System Integrations
| | System Integrations | Custom Integrations |
| -------------------- | -------------------------------------- | ----------------------------- |
| **Source** | Global registry (managed by RubixKube) | Tenant self-served |
| **Protocol** | Determined by registry | `mcp` or `rest` (your choice) |
| **Visibility** | All tenants (based on config) | Your tenant only |
| **Tool definitions** | From registry | You provide them |
| **Deletion** | Disable only | Hard delete |
| **Plan** | All plans | Enterprise only |
***
## What You Learned
* Available system integrations (Slack, PagerDuty, Prometheus, Webhooks)
* Notification rules and delivery channels
* How to register private MCP servers and REST APIs as custom integrations
* Authentication options: Bearer, OAuth 2.1, API Key, Basic Auth
* How custom integrations appear automatically in the MCP gateway
***
## Related Guides
* [Using Agent Skills](/using/skills) — Extend agents with structured workflows
* [Using Agents & Tools](/using/agents) — Monitor agent health and capabilities
* [Dashboard](/using/dashboard) — Your command center for infrastructure health
***
## Need Help?
Email: [connect@rubixkube.ai](mailto:connect@rubixkube.ai)
Please include your Tenant ID (Settings → Organization), timestamp, and screenshots.
Step-by-step fixes for common issues across Dashboard, Insights, Agents, and more.
Answers to common questions about setup, RCA, agents, and docs.
Browse all guides to learn workflows and best practices.