> ## Documentation Index
> Fetch the complete documentation index at: https://docs.rubixkube.ai/llms.txt
> Use this file to discover all available pages before exploring further.
# Extend Kepler: integrations, skills, and specialists
> Connect Kepler to your stack with MCP integrations, keep credentials in the system keychain, add skills and custom slash commands, and save specialist agents for questions you ask often.
Kepler works with what is already on your machine: kubectl, cloud CLIs, ssh, the files in your workspaces. When you need more, you connect an integration, drop in a skill, or teach it a command. This page covers all four ways to extend it.
## Integrations (MCP servers)
An integration gives Kepler tools for one part of your stack: query Grafana, list PagerDuty incidents, read a GitHub pull request, describe an EC2 instance. Integrations speak MCP, so anything with an MCP server can be connected.
Open **Settings > Tools & MCP**. The catalog lists the integrations Kepler knows how to set up:
| Category | Integrations |
| ---------------------- | ----------------------------------------------------------------------------------------------- |
| Cloud and clusters | AWS, Google Cloud, Azure, Kubernetes |
| Observability | Grafana, Prometheus, Datadog, New Relic, Honeycomb, Dynatrace, Elastic, Sentry, Oodle |
| Incidents and delivery | PagerDuty, Spike, GitHub, GitLab, CircleCI, Argo CD, Terraform |
| Team and knowledge | Slack, Linear, Atlassian (Jira and Confluence), Notion |
| RubixKube | The RubixKube platform: active issues, cluster health, evidence-backed RCAs and pending actions |
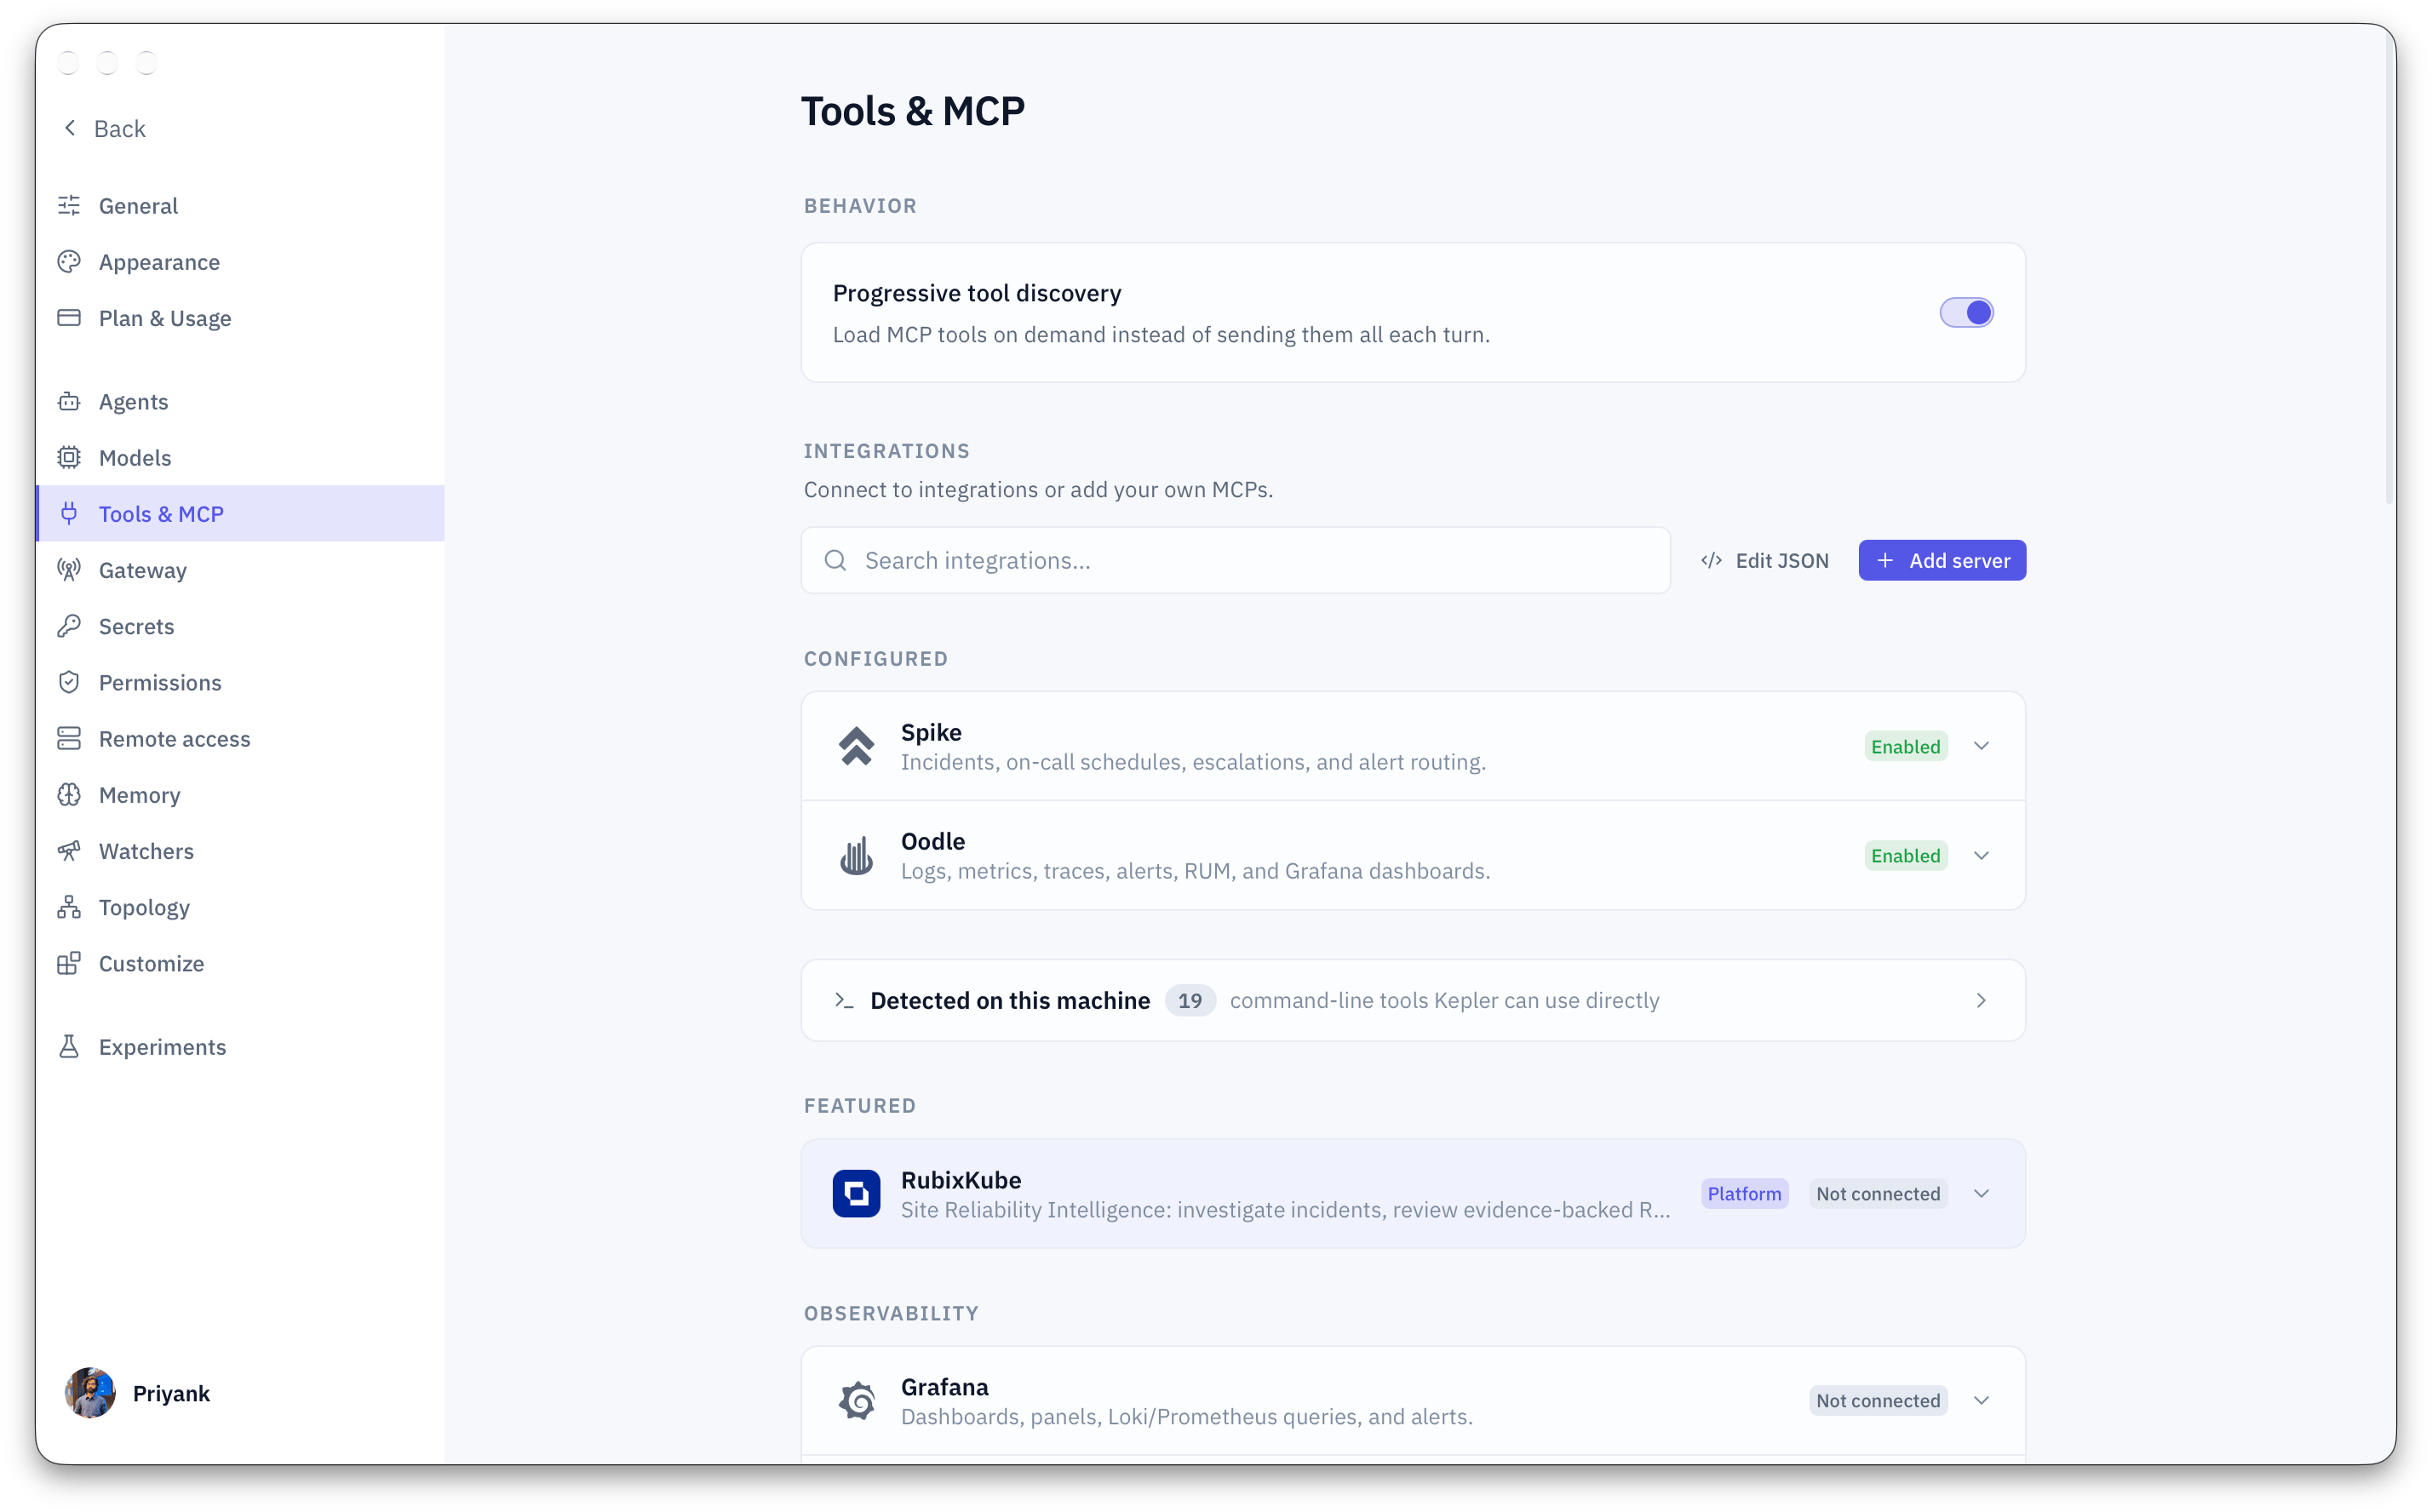 The integrations catalog. Configured integrations sit at the top with their status; the tools Kepler found on your machine are one row below.
### Add an integration
Open **Settings > Tools & MCP** and choose the integration. Each card tells you what credential it needs.
Kepler stores tokens in your operating system keychain and refers to them by name. See [Secrets](#secrets) below.
You do not need to restart anything. On the next turn, Kepler can use the new tools.
You can also skip the settings page and ask directly:
```
Add the Grafana MCP server. The URL is https://grafana.internal and the token is in my keychain as GRAFANA_TOKEN.
```
Anything not in the catalog can be added as a custom MCP server on the same page. The page also lists the command-line tools it detected on your machine, such as kubectl, helm and your cloud CLIs, which Kepler can use directly without any setup.
### What integrations look like in practice
```
Pull the p99 latency for checkout from the Grafana dashboard for the last 6 hours and tell me when it jumped.
```
```
Who is on call for payments right now, and what PagerDuty incidents are open on that service?
```
```
Show me the pull requests merged to the checkout repo in the last 24 hours.
```
```
Which EC2 instances in the prod account changed state this week?
```
MCP tools ask for your approval before they run, unless you change that in **Settings > Permissions**. The approval shows the tool and its arguments so you can see exactly what will be sent.
Large servers hand over their tools a few at a time, so the conversation stays fast even with many integrations connected. **Progressive tool discovery** in **Settings > Tools & MCP** controls this. Leave it on.
## Secrets
Credentials never sit in a config file. **Settings > Secrets** keeps named credentials in your operating system keychain. An integration config only ever holds the name, written as `${NAME}`.
In **Settings > Secrets**, add a name such as `GRAFANA_TOKEN` and paste the value.
In the integration's settings, use `${GRAFANA_TOKEN}` wherever the token is needed.
The Secrets page shows which integrations use each credential, so you know what breaks before you delete one.
## Skills
A skill is a capability written in Markdown: a `SKILL.md` file, and optionally scripts beside it, in its own folder. Kepler loads a skill the moment it is needed, or when you trigger it as a slash command.
Skills live in `~/.kepler/skills` for everything you do, or in `.kepler/skills` inside a workspace for one project. Claude Code skill folders work as they are: drop them in, or import them from **Settings > Customize**, which lists any Claude Code skills it finds on your machine.
A skill worth writing is one you would otherwise explain every time:
```markdown theme={null}
# pod-crashloop-triage
When a pod is crashlooping:
1. Describe the pod and read the last termination reason.
2. Pull the previous container's logs, not the current ones.
3. Check the ConfigMap and Secret it mounts for a recent change.
4. Report cause, evidence and a one-line fix. Do not restart anything.
```
Save that as `~/.kepler/skills/pod-crashloop-triage/SKILL.md`. It appears in the `/` menu as `/pod-crashloop-triage`, and Kepler also reaches for it on its own when the situation fits.
Manage skills in **Settings > Customize**: create one from a template, import from Claude Code, edit the file, add a script.
## Custom slash commands
A custom command is a prompt you keep retyping, saved under a name. The quickest way to make one is to describe it:
```
/command write a weekly capacity brief for the cluster I name, covering CPU, memory and PVC headroom
```
Kepler drafts the command and saves it. From then on you call it by name, with arguments:
```
/capacity-brief gke-prod-eu
```
Commands are Markdown files. The file name is the command name, and `$ARGUMENTS` inside the file is replaced by whatever you type after the command.
| Scope | Location |
| ------------- | -------------------------------------------------------------------------------------- |
| Everywhere | `~/.kepler/commands/.md` |
| One workspace | `/.kepler/commands/.md`. Overrides a global command of the same name. |
See [Commands and shortcuts](/kepler/commands) for the full built-in list.
## Specialist agents
A specialist is a read-only agent with its own persona and tools. Kepler builds one-off specialists on its own when it fans out an investigation, so you do not have to think about them. Save one yourself when you ask the same kind of question often:
```
/agent a cost analyst who reads our AWS bill by tag and cluster and explains week-over-week changes
```
Saved specialists appear in **Settings > Agents**. Ask for parallel work and Kepler hands side questions to specialists that run in the background while the main conversation keeps moving:
```
Check three things in parallel: the checkout pods, the last deploy diff, and the Grafana error-rate panel. Bring me one summary.
```
## Identity on your channels
When Kepler reaches you on WhatsApp, Slack, Telegram or Discord, it signs its replies with a name and emoji you choose in **Settings > Customize**, so its messages never read as yours. See [Chat from your phone](/kepler/channels).
Standing rules and lifecycle hooks (run a command before a tool, after a run, or on approval) are listed under **Settings > Customize** as coming soon. They are not available in this release.
## Where to go next
Set MCP servers to allow, ask or block.
Every built-in slash command.
Prompts that use your integrations.
Tools & MCP, Secrets, Agents and Customize, in detail.
The integrations catalog. Configured integrations sit at the top with their status; the tools Kepler found on your machine are one row below.
### Add an integration
Open **Settings > Tools & MCP** and choose the integration. Each card tells you what credential it needs.
Kepler stores tokens in your operating system keychain and refers to them by name. See [Secrets](#secrets) below.
You do not need to restart anything. On the next turn, Kepler can use the new tools.
You can also skip the settings page and ask directly:
```
Add the Grafana MCP server. The URL is https://grafana.internal and the token is in my keychain as GRAFANA_TOKEN.
```
Anything not in the catalog can be added as a custom MCP server on the same page. The page also lists the command-line tools it detected on your machine, such as kubectl, helm and your cloud CLIs, which Kepler can use directly without any setup.
### What integrations look like in practice
```
Pull the p99 latency for checkout from the Grafana dashboard for the last 6 hours and tell me when it jumped.
```
```
Who is on call for payments right now, and what PagerDuty incidents are open on that service?
```
```
Show me the pull requests merged to the checkout repo in the last 24 hours.
```
```
Which EC2 instances in the prod account changed state this week?
```
MCP tools ask for your approval before they run, unless you change that in **Settings > Permissions**. The approval shows the tool and its arguments so you can see exactly what will be sent.
Large servers hand over their tools a few at a time, so the conversation stays fast even with many integrations connected. **Progressive tool discovery** in **Settings > Tools & MCP** controls this. Leave it on.
## Secrets
Credentials never sit in a config file. **Settings > Secrets** keeps named credentials in your operating system keychain. An integration config only ever holds the name, written as `${NAME}`.
In **Settings > Secrets**, add a name such as `GRAFANA_TOKEN` and paste the value.
In the integration's settings, use `${GRAFANA_TOKEN}` wherever the token is needed.
The Secrets page shows which integrations use each credential, so you know what breaks before you delete one.
## Skills
A skill is a capability written in Markdown: a `SKILL.md` file, and optionally scripts beside it, in its own folder. Kepler loads a skill the moment it is needed, or when you trigger it as a slash command.
Skills live in `~/.kepler/skills` for everything you do, or in `.kepler/skills` inside a workspace for one project. Claude Code skill folders work as they are: drop them in, or import them from **Settings > Customize**, which lists any Claude Code skills it finds on your machine.
A skill worth writing is one you would otherwise explain every time:
```markdown theme={null}
# pod-crashloop-triage
When a pod is crashlooping:
1. Describe the pod and read the last termination reason.
2. Pull the previous container's logs, not the current ones.
3. Check the ConfigMap and Secret it mounts for a recent change.
4. Report cause, evidence and a one-line fix. Do not restart anything.
```
Save that as `~/.kepler/skills/pod-crashloop-triage/SKILL.md`. It appears in the `/` menu as `/pod-crashloop-triage`, and Kepler also reaches for it on its own when the situation fits.
Manage skills in **Settings > Customize**: create one from a template, import from Claude Code, edit the file, add a script.
## Custom slash commands
A custom command is a prompt you keep retyping, saved under a name. The quickest way to make one is to describe it:
```
/command write a weekly capacity brief for the cluster I name, covering CPU, memory and PVC headroom
```
Kepler drafts the command and saves it. From then on you call it by name, with arguments:
```
/capacity-brief gke-prod-eu
```
Commands are Markdown files. The file name is the command name, and `$ARGUMENTS` inside the file is replaced by whatever you type after the command.
| Scope | Location |
| ------------- | -------------------------------------------------------------------------------------- |
| Everywhere | `~/.kepler/commands/.md` |
| One workspace | `/.kepler/commands/.md`. Overrides a global command of the same name. |
See [Commands and shortcuts](/kepler/commands) for the full built-in list.
## Specialist agents
A specialist is a read-only agent with its own persona and tools. Kepler builds one-off specialists on its own when it fans out an investigation, so you do not have to think about them. Save one yourself when you ask the same kind of question often:
```
/agent a cost analyst who reads our AWS bill by tag and cluster and explains week-over-week changes
```
Saved specialists appear in **Settings > Agents**. Ask for parallel work and Kepler hands side questions to specialists that run in the background while the main conversation keeps moving:
```
Check three things in parallel: the checkout pods, the last deploy diff, and the Grafana error-rate panel. Bring me one summary.
```
## Identity on your channels
When Kepler reaches you on WhatsApp, Slack, Telegram or Discord, it signs its replies with a name and emoji you choose in **Settings > Customize**, so its messages never read as yours. See [Chat from your phone](/kepler/channels).
Standing rules and lifecycle hooks (run a command before a tool, after a run, or on approval) are listed under **Settings > Customize** as coming soon. They are not available in this release.
## Where to go next
Set MCP servers to allow, ask or block.
Every built-in slash command.
Prompts that use your integrations.
Tools & MCP, Secrets, Agents and Customize, in detail.